Master the Pull Request: A Developer's Guide to Git CLI and GitHub
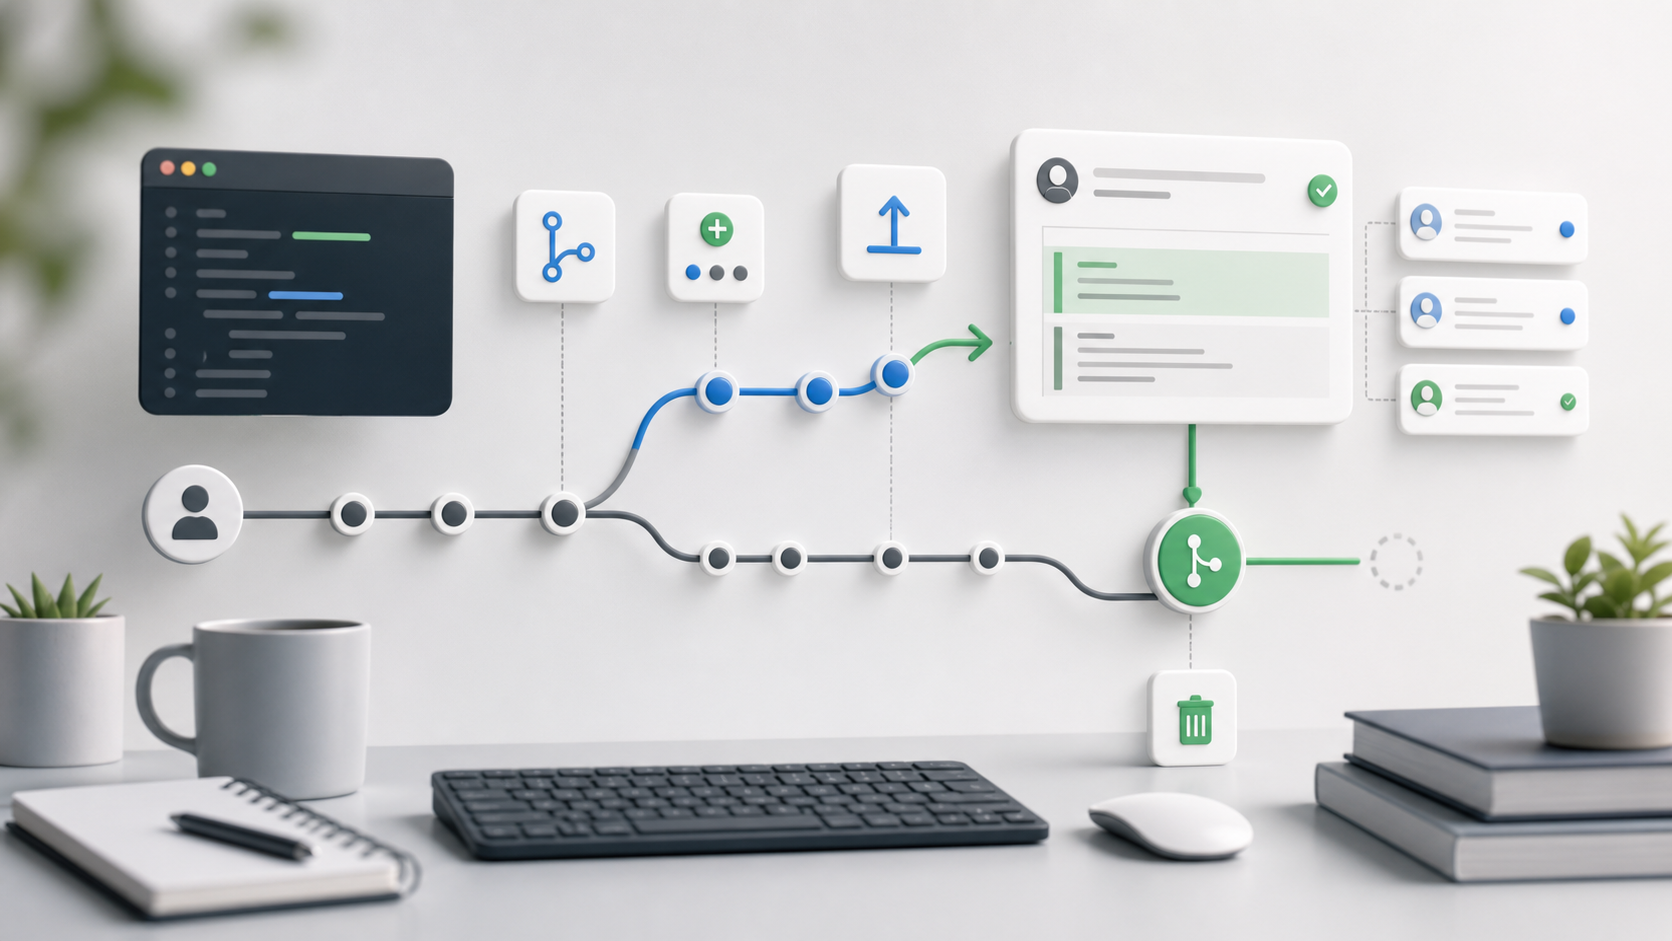
A pull request, usually shortened to PR, is the standard way to propose changes to a shared codebase. It lets teammates review the work, discuss implementation details, request changes, and merge the branch into the main project when it is ready.
This guide covers the basic professional workflow: create a branch locally with Git, commit and push the work, open a PR on GitHub, respond to review comments, and clean up after merge.
Step 1: Create a Working Branch
Avoid working directly on main or master. A dedicated branch keeps unfinished work isolated and makes review easier.
Start by moving to the main branch and syncing it with the remote repository.
git checkout main
git pull origin main
Create and switch to a new feature branch.
git checkout -b feature/add-dark-modeUse a short, descriptive, hyphenated branch name. Common prefixes include:
feature/add-dark-mode
fix/header-overflow
docs/update-readme
refactor/navigation-state
The -b flag tells Git to create the branch and switch to it in one command.
Step 2: Commit and Push Your Work
After editing the code, check which files changed.
git statusStage the changes you want to include.
git add .For more precise commits, stage specific files instead of everything.
git add styles.css
git add src/components/ThemeToggle.tsx
Commit the staged changes with a clear message.
git commit -m "Add dark mode toggle and theme variables"Push the branch to GitHub.
git push origin feature/add-dark-modeFor the first push, you can also set the upstream branch.
git push -u origin feature/add-dark-modeAfter setting upstream, future pushes from the same branch can usually be shortened to:
git pushStep 3: Open the Pull Request
Once the branch exists on GitHub, open a pull request.
Option A: GitHub Web Interface
- Open the repository on GitHub.
- If GitHub shows a banner for the recently pushed branch, click
Compare & pull request. - If there is no banner, open the
Pull requeststab and clickNew pull request. - Select the base branch, usually
main, and the compare branch, such asfeature/add-dark-mode. - Write a clear title and description.
- Click
Create pull request.
A useful PR description usually explains:
- What changed
- Why the change was needed
- How it was tested
- Screenshots or recordings for UI changes
- Related issues or tickets
Option B: GitHub CLI
If the GitHub CLI is installed and authenticated, create the PR from the terminal.
gh pr create --title "Add dark mode feature" --body "This PR introduces a dark mode toggle to the main navigation navbar."If you omit the --title and --body flags, gh can prompt you interactively.
gh pr createChecking PR Status from the Terminal
When you want to inspect PR state from a CLI, the most convenient approach is usually the official CLI for the hosting platform. For GitHub, use gh; for GitLab, use glab. GitLab calls PRs merge requests, so its commands use mr.
GitHub CLI: gh pr list
If GitHub CLI is installed and authenticated with gh auth login, use gh pr list to inspect pull requests in the current repository.
By default, gh pr list shows open PRs.
gh pr list

# Or explicitly:
gh pr list --state open
To list PRs that were closed without being merged:
gh pr list --state closedTo list merged PRs:
gh pr list --state mergedTo list every state:
gh pr list --state allUseful filters:
# PRs authored by you
gh pr list --author "@me"

# Increase the default result limit
gh pr list --limit 50

# Query a different repository
gh pr list -R owner/repository-name
For more options, check the official gh pr list manual.
GitLab CLI: glab mr list
In GitLab, the equivalent object is a merge request. glab mr list defaults to open merge requests.
glab mr listUse these flags for other states:
# Closed merge requests
glab mr list --closed

# Merged merge requests
glab mr list --merged

# All merge requests
glab mr list --all
If you often switch repositories, -R lets you choose another repository.
glab mr list -R group/projectFor more options, check the official glab mr list docs.
This keeps state checks close to the Git workflow: use git status for local changes, gh pr list or glab mr list for review objects, and the web UI only when you need deeper discussion or visual inspection.
Step 4: Respond to Review and Merge
After the PR is open, reviewers can leave comments, ask questions, approve the change, or request updates.
If reviewers request changes, keep working on the same branch. You do not need to create a new PR.
# Make the requested edits first
git status
git add .
git commit -m "Address PR review feedback"
git push
GitHub automatically updates the open PR with the new commits.
When the PR is approved and checks pass, merge it through GitHub. Depending on the repository settings, the merge method may be:
- Merge commit
- Squash and merge
- Rebase and merge
Follow the repository’s preferred convention.
Step 5: Clean Up After Merge
After the PR is merged, delete the local branch.
git checkout main
git pull origin main
git branch -d feature/add-dark-mode
If the remote branch is no longer needed, delete it as well.
git push origin --delete feature/add-dark-modeGitHub often offers a Delete branch button after a PR is merged.
Full Workflow Summary
git checkout main
git pull origin main
git checkout -b feature/add-dark-mode

# Edit files

git status
git add .
git commit -m "Add dark mode toggle and theme variables"
git push -u origin feature/add-dark-mode

gh pr create
After review:
# Apply requested changes
git add .
git commit -m "Address PR review feedback"
git push
After merge:
git checkout main
git pull origin main
git branch -d feature/add-dark-mode
Key Takeaways
- Do not work directly on
mainfor feature or bugfix work. - Keep branches focused and clearly named.
- Commit related changes together with readable messages.
- Push the branch to GitHub and open a PR for review.
- Address review feedback on the same branch.
- Merge only after approval and passing checks.
- Delete old branches after the work is merged.
풀 리퀘스트는 보통 PR이라고 줄여 부르며, 공유 코드베이스에 변경 사항을 제안하는 표준 방식입니다. 팀원은 PR을 통해 작업을 검토하고, 구현 세부 사항을 논의하고, 변경을 요청하고, 준비가 끝난 브랜치를 메인 프로젝트에 병합할 수 있습니다.
이 가이드는 Git으로 로컬 브랜치를 만들고, 작업을 커밋해 푸시하고, GitHub에서 PR을 열고, 리뷰 댓글에 대응하고, 병합 후 정리하는 기본적인 실무 흐름을 다룹니다.
1단계: 작업 브랜치 만들기
main이나 master에서 직접 작업하지 마세요. 전용 브랜치를 사용하면 아직 끝나지 않은 작업을 분리할 수 있고 리뷰도 쉬워집니다.
먼저 main 브랜치로 이동하고 원격 저장소와 동기화합니다.
git checkout main
git pull origin main
새 기능 브랜치를 만들고 전환합니다.
git checkout -b feature/add-dark-mode
짧고 설명적인 하이픈 형식의 브랜치 이름을 사용합니다. 자주 쓰는 접두사는 다음과 같습니다.
feature/add-dark-mode
fix/header-overflow
docs/update-readme
refactor/navigation-state
-b 플래그는 Git에게 브랜치를 만들고 한 번에 그 브랜치로 전환하라고 알려줍니다.
2단계: 작업 커밋하고 푸시하기
코드를 수정한 뒤 어떤 파일이 바뀌었는지 확인합니다.
git status
포함하려는 변경 사항을 스테이징합니다.
git add .
더 정밀한 커밋이 필요하다면 모든 파일 대신 특정 파일만 스테이징합니다.
git add styles.css
git add src/components/ThemeToggle.tsx
스테이징한 변경 사항을 명확한 메시지로 커밋합니다.
git commit -m "Add dark mode toggle and theme variables"
브랜치를 GitHub로 푸시합니다.
git push origin feature/add-dark-mode
첫 푸시에서는 upstream 브랜치를 함께 설정할 수도 있습니다.
git push -u origin feature/add-dark-mode
upstream을 설정한 뒤에는 같은 브랜치에서 이후 푸시를 보통 이렇게 줄일 수 있습니다.
git push
3단계: 풀 리퀘스트 열기
브랜치가 GitHub에 생기면 풀 리퀘스트를 엽니다.
옵션 A: GitHub 웹 인터페이스
- GitHub에서 저장소를 엽니다.
- GitHub가 최근 푸시한 브랜치 배너를 보여주면
Compare & pull request를 클릭합니다. - 배너가 없다면
Pull requests탭을 열고New pull request를 클릭합니다. - base 브랜치, 보통
main, 그리고 compare 브랜치, 예를 들어feature/add-dark-mode를 선택합니다. - 명확한 제목과 설명을 작성합니다.
Create pull request를 클릭합니다.
좋은 PR 설명은 보통 다음을 설명합니다.
- 무엇이 바뀌었는지
- 왜 변경이 필요했는지
- 어떻게 테스트했는지
- UI 변경이라면 스크린샷이나 녹화
- 관련 이슈나 티켓
옵션 B: GitHub CLI
GitHub CLI가 설치되어 있고 인증되어 있다면 터미널에서 PR을 만들 수 있습니다.
gh pr create --title "Add dark mode feature" --body "This PR introduces a dark mode toggle to the main navigation navbar."
--title과 --body 플래그를 생략하면 gh가 대화형으로 입력을 요청할 수 있습니다.
gh pr create
터미널에서 PR 상태 확인하기
CLI에서 PR 상태를 확인할 때는 사용하는 원격 저장소 플랫폼의 공식 CLI를 쓰는 방식이 가장 편합니다. GitHub에서는 gh, GitLab에서는 glab을 사용합니다. GitLab에서는 PR을 MR(Merge Request)이라고 부르므로 명령도 mr을 사용합니다.
GitHub CLI: gh pr list
GitHub CLI가 설치되어 있고 gh auth login으로 인증되어 있다면, 현재 저장소의 풀 리퀘스트는 gh pr list로 확인할 수 있습니다.
기본적으로 gh pr list는 열린 PR만 보여줍니다.
gh pr list

# 또는 명시적으로:
gh pr list --state open
병합되지 않고 닫힌 PR을 보려면 다음을 사용합니다.
gh pr list --state closed
병합된 PR만 보려면 다음을 사용합니다.
gh pr list --state merged
모든 상태의 PR을 보려면 다음을 사용합니다.
gh pr list --state all
자주 쓰는 필터는 다음과 같습니다.
# 내가 작성한 PR만 보기
gh pr list --author "@me"

# 기본 출력 개수 제한 늘리기
gh pr list --limit 50

# 다른 저장소 조회하기
gh pr list -R owner/repository-name
더 많은 옵션은 공식 gh pr list 매뉴얼에서 확인할 수 있습니다.
GitLab CLI: glab mr list
GitLab에서는 PR에 해당하는 개념을 merge request라고 부릅니다. glab mr list는 기본적으로 열린 MR을 보여줍니다.
glab mr list
다른 상태는 다음 플래그로 확인합니다.
# 닫힌 MR
glab mr list --closed

# 병합된 MR
glab mr list --merged

# 모든 MR
glab mr list --all
저장소를 자주 바꿔 조회한다면 -R으로 다른 저장소를 지정할 수 있습니다.
glab mr list -R group/project
더 많은 옵션은 공식 glab mr list 문서에서 확인할 수 있습니다.
이렇게 정리하면 git status로 로컬 변경을 확인하고, gh pr list 또는 glab mr list로 리뷰 객체의 상태를 확인하며, 더 깊은 논의나 시각적 확인이 필요할 때만 웹 UI를 열면 됩니다.
4단계: 리뷰에 대응하고 병합하기
PR이 열리면 리뷰어는 댓글을 남기고, 질문하고, 변경을 승인하거나 수정을 요청할 수 있습니다.
리뷰어가 변경을 요청하면 같은 브랜치에서 계속 작업합니다. 새 PR을 만들 필요는 없습니다.
# Make the requested edits first
git status
git add .
git commit -m "Address PR review feedback"
git push
GitHub는 새 커밋으로 열린 PR을 자동 업데이트합니다.
PR이 승인되고 체크가 통과하면 GitHub에서 병합합니다. 저장소 설정에 따라 병합 방식은 다음 중 하나일 수 있습니다.
- Merge commit
- Squash and merge
- Rebase and merge
저장소에서 선호하는 규칙을 따르세요.
5단계: 병합 후 정리하기
PR이 병합되면 로컬 브랜치를 삭제합니다.
git checkout main
git pull origin main
git branch -d feature/add-dark-mode
원격 브랜치가 더 이상 필요 없다면 함께 삭제합니다.
git push origin --delete feature/add-dark-mode
GitHub는 PR이 병합된 뒤 Delete branch 버튼을 제공하는 경우가 많습니다.
전체 워크플로 요약
git checkout main
git pull origin main
git checkout -b feature/add-dark-mode

# Edit files

git status
git add .
git commit -m "Add dark mode toggle and theme variables"
git push -u origin feature/add-dark-mode

gh pr create
리뷰 후:
# Apply requested changes
git add .
git commit -m "Address PR review feedback"
git push
병합 후:
git checkout main
git pull origin main
git branch -d feature/add-dark-mode
핵심 정리
- 기능 개발이나 버그 수정은
main에서 직접 작업하지 않습니다. - 브랜치는 집중된 범위로 만들고 이름을 명확하게 짓습니다.
- 관련 변경을 함께 묶어 읽기 쉬운 메시지로 커밋합니다.
- 브랜치를 GitHub에 푸시하고 리뷰를 위한 PR을 엽니다.
- 리뷰 피드백은 같은 브랜치에서 반영합니다.
- 승인과 체크 통과 후에만 병합합니다.
- 작업이 병합된 뒤 오래된 브랜치를 삭제합니다.
Pull Request 通常简称为 PR,是向共享代码库提出变更的标准方式。它让团队成员可以审查工作、讨论实现细节、请求修改,并在准备好后将分支合并到主项目中。
本文介绍基础的专业工作流:用 Git 在本地创建分支,提交并推送工作,在 GitHub 上打开 PR,回应审查评论,并在合并后清理。
第 1 步:创建工作分支
避免直接在 main 或 master 上工作。专用分支可以隔离未完成的工作,也让审查更容易。
先切换到 main 分支,并与远程仓库同步。
git checkout main
git pull origin main
创建并切换到新的功能分支。
git checkout -b feature/add-dark-mode
使用简短、描述清晰、以连字符分隔的分支名。常见前缀包括:
feature/add-dark-mode
fix/header-overflow
docs/update-readme
refactor/navigation-state
-b 标志告诉 Git 创建分支,并在同一条命令中切换到该分支。
第 2 步:提交并推送你的工作
编辑代码后,检查哪些文件发生了变化。
git status
暂存你想包含的变更。
git add .
如果想让提交更精确,可以暂存具体文件,而不是暂存所有内容。
git add styles.css
git add src/components/ThemeToggle.tsx
用清晰的信息提交已暂存的变更。
git commit -m "Add dark mode toggle and theme variables"
将分支推送到 GitHub。
git push origin feature/add-dark-mode
第一次推送时,也可以设置 upstream 分支。
git push -u origin feature/add-dark-mode
设置 upstream 后,同一分支上的后续推送通常可以简化为:
git push
第 3 步:打开 Pull Request
分支出现在 GitHub 上后,就可以打开 Pull Request。
选项 A:GitHub 网页界面
- 在 GitHub 上打开仓库。
- 如果 GitHub 为最近推送的分支显示横幅,点击
Compare & pull request。 - 如果没有横幅,打开
Pull requests标签页并点击New pull request。 - 选择 base 分支,通常是
main,以及 compare 分支,例如feature/add-dark-mode。 - 写一个清晰的标题和描述。
- 点击
Create pull request。
有用的 PR 描述通常会说明:
- 改了什么
- 为什么需要这个变更
- 如何测试
- UI 变更的截图或录屏
- 相关 issue 或工单
选项 B:GitHub CLI
如果已经安装并认证 GitHub CLI,可以从终端创建 PR。
gh pr create --title "Add dark mode feature" --body "This PR introduces a dark mode toggle to the main navigation navbar."
如果省略 --title 和 --body 标志,gh 可以用交互方式提示你输入。
gh pr create
在终端查看 PR 状态
在 CLI 中查看 PR 状态时,最方便的方式通常是使用托管平台提供的官方 CLI。GitHub 使用 gh,GitLab 使用 glab。GitLab 将 PR 称为 merge request,所以命令使用 mr。
GitHub CLI:gh pr list
如果已经安装 GitHub CLI,并通过 gh auth login 完成认证,可以用 gh pr list 查看当前仓库的 pull request。
默认情况下,gh pr list 只显示打开状态的 PR。
gh pr list

# 或者显式指定:
gh pr list --state open
查看未合并但已关闭的 PR:
gh pr list --state closed
只查看已合并的 PR:
gh pr list --state merged
查看所有状态:
gh pr list --state all
常用过滤条件:
# 只看你创建的 PR
gh pr list --author "@me"

# 增加默认结果数量限制
gh pr list --limit 50

# 查询另一个仓库
gh pr list -R owner/repository-name
更多选项可以查看官方 gh pr list 手册。
GitLab CLI:glab mr list
在 GitLab 中,对应的对象是 merge request。glab mr list 默认显示打开状态的 merge request。
glab mr list
其他状态使用这些标志:
# 已关闭的 merge request
glab mr list --closed

# 已合并的 merge request
glab mr list --merged

# 所有 merge request
glab mr list --all
如果经常切换仓库,可以用 -R 指定另一个仓库。
glab mr list -R group/project
更多选项可以查看官方 glab mr list 文档。
这样可以把状态检查留在 Git 工作流附近:用 git status 查看本地变更,用 gh pr list 或 glab mr list 查看审查对象,只有在需要更深入讨论或视觉检查时再打开网页界面。
第 4 步:回应审查并合并
PR 打开后,审查者可以留下评论、提出问题、批准变更,或请求更新。
如果审查者请求修改,继续在同一分支上工作即可。不需要创建新的 PR。
# Make the requested edits first
git status
git add .
git commit -m "Address PR review feedback"
git push
GitHub 会用新的提交自动更新已打开的 PR。
当 PR 获得批准并且检查通过后,通过 GitHub 合并。根据仓库设置,合并方式可能是:
- Merge commit
- Squash and merge
- Rebase and merge
遵循仓库偏好的约定。
第 5 步:合并后清理
PR 合并后,删除本地分支。
git checkout main
git pull origin main
git branch -d feature/add-dark-mode
如果远程分支不再需要,也可以删除它。
git push origin --delete feature/add-dark-mode
GitHub 经常会在 PR 合并后提供 Delete branch 按钮。
完整工作流摘要
git checkout main
git pull origin main
git checkout -b feature/add-dark-mode

# Edit files

git status
git add .
git commit -m "Add dark mode toggle and theme variables"
git push -u origin feature/add-dark-mode

gh pr create
审查后:
# Apply requested changes
git add .
git commit -m "Address PR review feedback"
git push
合并后:
git checkout main
git pull origin main
git branch -d feature/add-dark-mode
关键要点
- 不要为了功能或修复直接在
main上工作。 - 保持分支聚焦,并使用清晰的名称。
- 将相关变更一起提交,并使用可读的提交信息。
- 将分支推送到 GitHub,并打开 PR 进行审查。
- 在同一分支上回应审查反馈。
- 只有在批准并通过检查后才合并。
- 工作合并后删除旧分支。
Pull Request は通常 PR と略され、共有コードベースに変更を提案する標準的な方法です。チームメンバーは作業をレビューし、実装の詳細を議論し、変更を依頼し、準備ができたブランチをメインプロジェクトへマージできます。
このガイドでは、Git でローカルブランチを作成し、作業をコミットしてプッシュし、GitHub で PR を開き、レビューコメントに対応し、マージ後に整理する基本的な実務ワークフローを扱います。
ステップ 1: 作業ブランチを作成する
main や master で直接作業するのは避けましょう。専用ブランチを使うことで、未完成の作業を分離でき、レビューもしやすくなります。
まず main ブランチに移動し、リモートリポジトリと同期します。
git checkout main
git pull origin main
新しい機能ブランチを作成して切り替えます。
git checkout -b feature/add-dark-mode
短く、説明的で、ハイフン区切りのブランチ名を使います。よく使われるプレフィックスは次のとおりです。
feature/add-dark-mode
fix/header-overflow
docs/update-readme
refactor/navigation-state
-b フラグは、ブランチを作成してそのブランチへ切り替えるよう Git に伝えます。
ステップ 2: 作業をコミットしてプッシュする
コードを編集したら、どのファイルが変更されたか確認します。
git status
含めたい変更をステージします。
git add .
より精密なコミットにしたい場合は、すべてではなく特定のファイルをステージします。
git add styles.css
git add src/components/ThemeToggle.tsx
ステージした変更を明確なメッセージでコミットします。
git commit -m "Add dark mode toggle and theme variables"
ブランチを GitHub にプッシュします。
git push origin feature/add-dark-mode
最初のプッシュでは、upstream ブランチも設定できます。
git push -u origin feature/add-dark-mode
upstream を設定した後は、同じブランチからの今後のプッシュは通常このように短くできます。
git push
ステップ 3: Pull Request を開く
ブランチが GitHub 上に作成されたら、Pull Request を開きます。
オプション A: GitHub の Web インターフェース
- GitHub でリポジトリを開きます。
- 最近プッシュしたブランチのバナーが表示されたら、
Compare & pull requestをクリックします。 - バナーがなければ、
Pull requestsタブを開いてNew pull requestをクリックします。 - base ブランチ、通常は
main、そして compare ブランチ、例えばfeature/add-dark-modeを選択します。 - 明確なタイトルと説明を書きます。
Create pull requestをクリックします。
役に立つ PR の説明には通常、次の内容を含めます。
- 何を変更したか
- なぜ変更が必要だったか
- どのようにテストしたか
- UI 変更の場合はスクリーンショットや録画
- 関連する issue やチケット
オプション B: GitHub CLI
GitHub CLI がインストールされ、認証済みであれば、ターミナルから PR を作成できます。
gh pr create --title "Add dark mode feature" --body "This PR introduces a dark mode toggle to the main navigation navbar."
--title と --body フラグを省略すると、gh が対話形式で入力を促すことがあります。
gh pr create
ターミナルで PR の状態を確認する
CLI で PR の状態を確認するなら、利用しているホスティングプラットフォームの公式 CLI を使うのが最も便利です。GitHub では gh、GitLab では glab を使います。GitLab では PR を merge request と呼ぶため、コマンドでは mr を使います。
GitHub CLI: gh pr list
GitHub CLI がインストールされ、gh auth login で認証済みであれば、現在のリポジトリの pull request は gh pr list で確認できます。
デフォルトでは、gh pr list は open 状態の PR だけを表示します。
gh pr list

# 明示する場合:
gh pr list --state open
マージされずに閉じられた PR を表示するには、次を使います。
gh pr list --state closed
マージ済みの PR だけを表示するには、次を使います。
gh pr list --state merged
すべての状態を表示するには、次を使います。
gh pr list --state all
よく使うフィルターは次のとおりです。
# 自分が作成した PR だけを見る
gh pr list --author "@me"

# デフォルトの取得件数を増やす
gh pr list --limit 50

# 別のリポジトリを確認する
gh pr list -R owner/repository-name
その他のオプションは公式の gh pr list マニュアルで確認できます。
GitLab CLI: glab mr list
GitLab では、対応するオブジェクトは merge request です。glab mr list はデフォルトで open 状態の merge request を表示します。
glab mr list
他の状態は次のフラグで確認します。
# closed の merge request
glab mr list --closed

# merged の merge request
glab mr list --merged

# すべての merge request
glab mr list --all
リポジトリを頻繁に切り替える場合は、-R で別のリポジトリを指定できます。
glab mr list -R group/project
その他のオプションは公式の glab mr list ドキュメントで確認できます。
この流れにすると、ローカル変更は git status、レビュー対象の状態は gh pr list または glab mr list で確認し、より深い議論や視覚的な確認が必要なときだけ Web UI を開けば済みます。
ステップ 4: レビューに対応してマージする
PR が開かれると、レビュアーはコメントを残したり、質問したり、変更を承認したり、更新を依頼したりできます。
レビュアーが変更を依頼した場合は、同じブランチで作業を続けます。新しい PR を作る必要はありません。
# Make the requested edits first
git status
git add .
git commit -m "Address PR review feedback"
git push
GitHub は新しいコミットで開いている PR を自動的に更新します。
PR が承認され、チェックが通ったら、GitHub 上でマージします。リポジトリ設定によって、マージ方法は次のいずれかになります。
- Merge commit
- Squash and merge
- Rebase and merge
リポジトリで推奨されている規約に従いましょう。
ステップ 5: マージ後に整理する
PR がマージされたら、ローカルブランチを削除します。
git checkout main
git pull origin main
git branch -d feature/add-dark-mode
リモートブランチが不要な場合は、それも削除します。
git push origin --delete feature/add-dark-mode
GitHub は PR がマージされた後に Delete branch ボタンを表示することがよくあります。
全体ワークフローのまとめ
git checkout main
git pull origin main
git checkout -b feature/add-dark-mode

# Edit files

git status
git add .
git commit -m "Add dark mode toggle and theme variables"
git push -u origin feature/add-dark-mode

gh pr create
レビュー後:
# Apply requested changes
git add .
git commit -m "Address PR review feedback"
git push
マージ後:
git checkout main
git pull origin main
git branch -d feature/add-dark-mode
重要なポイント
- 機能開発やバグ修正では
mainで直接作業しません。 - ブランチは焦点を絞り、名前を明確にします。
- 関連する変更をまとめて、読みやすいメッセージでコミットします。
- ブランチを GitHub にプッシュし、レビュー用の PR を開きます。
- レビューへの対応は同じブランチで行います。
- 承認され、チェックが通ってからマージします。
- 作業がマージされたら古いブランチを削除します。
Un pull request, normalmente abreviado como PR, es la forma estándar de proponer cambios en una base de código compartida. Permite que el equipo revise el trabajo, discuta detalles de implementación, solicite cambios y fusione la rama en el proyecto principal cuando esté lista.
Esta guía cubre el flujo profesional básico: crear una rama localmente con Git, confirmar y subir el trabajo, abrir un PR en GitHub, responder comentarios de revisión y limpiar después del merge.
Paso 1: crear una rama de trabajo
Evita trabajar directamente en main o master. Una rama dedicada mantiene aislado el trabajo sin terminar y facilita la revisión.
Empieza moviéndote a la rama principal y sincronizándola con el repositorio remoto.
git checkout main
git pull origin main
Crea y cambia a una nueva rama de funcionalidad.
git checkout -b feature/add-dark-mode
Usa un nombre de rama corto, descriptivo y separado con guiones. Algunos prefijos comunes son:
feature/add-dark-mode
fix/header-overflow
docs/update-readme
refactor/navigation-state
La bandera -b le indica a Git que cree la rama y cambie a ella en un solo comando.
Paso 2: confirmar y subir tu trabajo
Después de editar el código, revisa qué archivos cambiaron.
git status
Prepara los cambios que quieres incluir.
git add .
Para commits más precisos, prepara archivos específicos en lugar de todo.
git add styles.css
git add src/components/ThemeToggle.tsx
Confirma los cambios preparados con un mensaje claro.
git commit -m "Add dark mode toggle and theme variables"
Sube la rama a GitHub.
git push origin feature/add-dark-mode
En el primer push, también puedes configurar la rama upstream.
git push -u origin feature/add-dark-mode
Después de configurar upstream, los futuros pushes desde la misma rama normalmente se pueden abreviar a:
git push
Paso 3: abrir el pull request
Cuando la rama existe en GitHub, abre un pull request.
Opción A: interfaz web de GitHub
- Abre el repositorio en GitHub.
- Si GitHub muestra un banner para la rama recién subida, haz clic en
Compare & pull request. - Si no hay banner, abre la pestaña
Pull requestsy haz clic enNew pull request. - Selecciona la rama base, normalmente
main, y la rama de comparación, comofeature/add-dark-mode. - Escribe un título y una descripción claros.
- Haz clic en
Create pull request.
Una descripción útil de PR normalmente explica:
- Qué cambió
- Por qué era necesario el cambio
- Cómo se probó
- Capturas o grabaciones para cambios de UI
- Issues o tickets relacionados
Opción B: GitHub CLI
Si GitHub CLI está instalado y autenticado, crea el PR desde la terminal.
gh pr create --title "Add dark mode feature" --body "This PR introduces a dark mode toggle to the main navigation navbar."
Si omites las banderas --title y --body, gh puede pedirte los datos de forma interactiva.
gh pr create
Revisar el estado de PR desde la terminal
Cuando quieres revisar el estado de un PR desde la CLI, lo más cómodo suele ser usar la CLI oficial de la plataforma donde está el repositorio. Para GitHub, usa gh; para GitLab, usa glab. GitLab llama merge requests a los PR, así que sus comandos usan mr.
GitHub CLI: gh pr list
Si GitHub CLI está instalado y autenticado con gh auth login, usa gh pr list para revisar los pull requests del repositorio actual.
Por defecto, gh pr list muestra los PR abiertos.
gh pr list

# O de forma explícita:
gh pr list --state open
Para listar PR cerrados sin merge:
gh pr list --state closed
Para listar PR fusionados:
gh pr list --state merged
Para listar todos los estados:
gh pr list --state all
Filtros útiles:
# PR creados por ti
gh pr list --author "@me"

# Aumentar el límite de resultados por defecto
gh pr list --limit 50

# Consultar otro repositorio
gh pr list -R owner/repository-name
Para más opciones, revisa el manual oficial de gh pr list.
GitLab CLI: glab mr list
En GitLab, el objeto equivalente es un merge request. glab mr list muestra por defecto los merge requests abiertos.
glab mr list
Usa estas banderas para otros estados:
# Merge requests cerrados
glab mr list --closed

# Merge requests fusionados
glab mr list --merged

# Todos los merge requests
glab mr list --all
Si cambias de repositorio con frecuencia, -R te permite elegir otro repositorio.
glab mr list -R group/project
Para más opciones, revisa la documentación oficial de glab mr list.
Así mantienes la revisión de estado cerca del flujo de Git: usa git status para cambios locales, gh pr list o glab mr list para objetos de revisión, y abre la interfaz web solo cuando necesites discusión más profunda o inspección visual.
Paso 4: responder a la revisión y hacer merge
Después de abrir el PR, los revisores pueden dejar comentarios, hacer preguntas, aprobar el cambio o pedir actualizaciones.
Si los revisores solicitan cambios, sigue trabajando en la misma rama. No necesitas crear un PR nuevo.
# Make the requested edits first
git status
git add .
git commit -m "Address PR review feedback"
git push
GitHub actualiza automáticamente el PR abierto con los nuevos commits.
Cuando el PR esté aprobado y los checks pasen, fusiónalo desde GitHub. Según la configuración del repositorio, el método de merge puede ser:
- Merge commit
- Squash and merge
- Rebase and merge
Sigue la convención preferida del repositorio.
Paso 5: limpiar después del merge
Después de fusionar el PR, elimina la rama local.
git checkout main
git pull origin main
git branch -d feature/add-dark-mode
Si la rama remota ya no es necesaria, elimínala también.
git push origin --delete feature/add-dark-mode
GitHub suele ofrecer un botón Delete branch después de que se fusiona un PR.
Resumen del flujo completo
git checkout main
git pull origin main
git checkout -b feature/add-dark-mode

# Edit files

git status
git add .
git commit -m "Add dark mode toggle and theme variables"
git push -u origin feature/add-dark-mode

gh pr create
Después de la revisión:
# Apply requested changes
git add .
git commit -m "Address PR review feedback"
git push
Después del merge:
git checkout main
git pull origin main
git branch -d feature/add-dark-mode
Puntos clave
- No trabajes directamente en
mainpara funciones o correcciones. - Mantén las ramas enfocadas y con nombres claros.
- Confirma cambios relacionados juntos con mensajes legibles.
- Sube la rama a GitHub y abre un PR para revisión.
- Responde a los comentarios de revisión en la misma rama.
- Haz merge solo después de la aprobación y de que los checks pasen.
- Elimina las ramas antiguas después de que el trabajo se fusione.