로컬 AI 이미지 생성 입문: ComfyUI와 FLUX로 첫 그림 만들기

“로컬 모델로 만든다”는 말은 보통 모델 파일을 내 컴퓨터에 내려받아, 내 GPU나 시스템 메모리로 추론을 실행한다는 뜻이다. 웹 서비스의 이미지 생성 버튼과 달리 설치·저장 공간·메모리를 직접 챙겨야 하지만, 모델과 작업 순서를 선택하고 반복 실험하기 좋다. 이 글은 첨부된 대화의 모델 이름을 그대로 따라 하기보다, 정지 이미지 한 장을 만드는 가장 이해하기 쉬운 경로에 집중한다.
먼저 이름부터 구분하자
- 실행 앱: 모델과 작업 단계를 연결하는 화면. 여기서는 ComfyUI 공식 사이트의 로컬 설치판을 쓴다.
- 이미지 모델: 프롬프트를 바탕으로 픽셀을 생성하는 가중치. 예시는 FLUX.2 Klein 4B 공식 모델이다.
- 워크플로: 모델 로드 → 문장 입력 → 생성 → 저장을 잇는 노드 구성. ComfyUI의 FLUX.2 Klein 예제를 사용한다.
- VRAM: GPU가 작업 중 모델과 중간 결과를 담는 메모리. 필요한 양은 모델·해상도·정밀도에 따라 달라진다.
ComfyUI는 모델 자체가 아니라 노드 기반 실행 환경이다. 아래 공식 화면의 A–F는 기본 Stable Diffusion 1.5 예시로, 체크포인트·캔버스·프롬프트·샘플러·디코더·저장 단계를 보여 준다. FLUX.2 Klein의 실제 노드와 파일 구성은 이 그림과 다르므로 개념을 읽는 용도로만 보자.
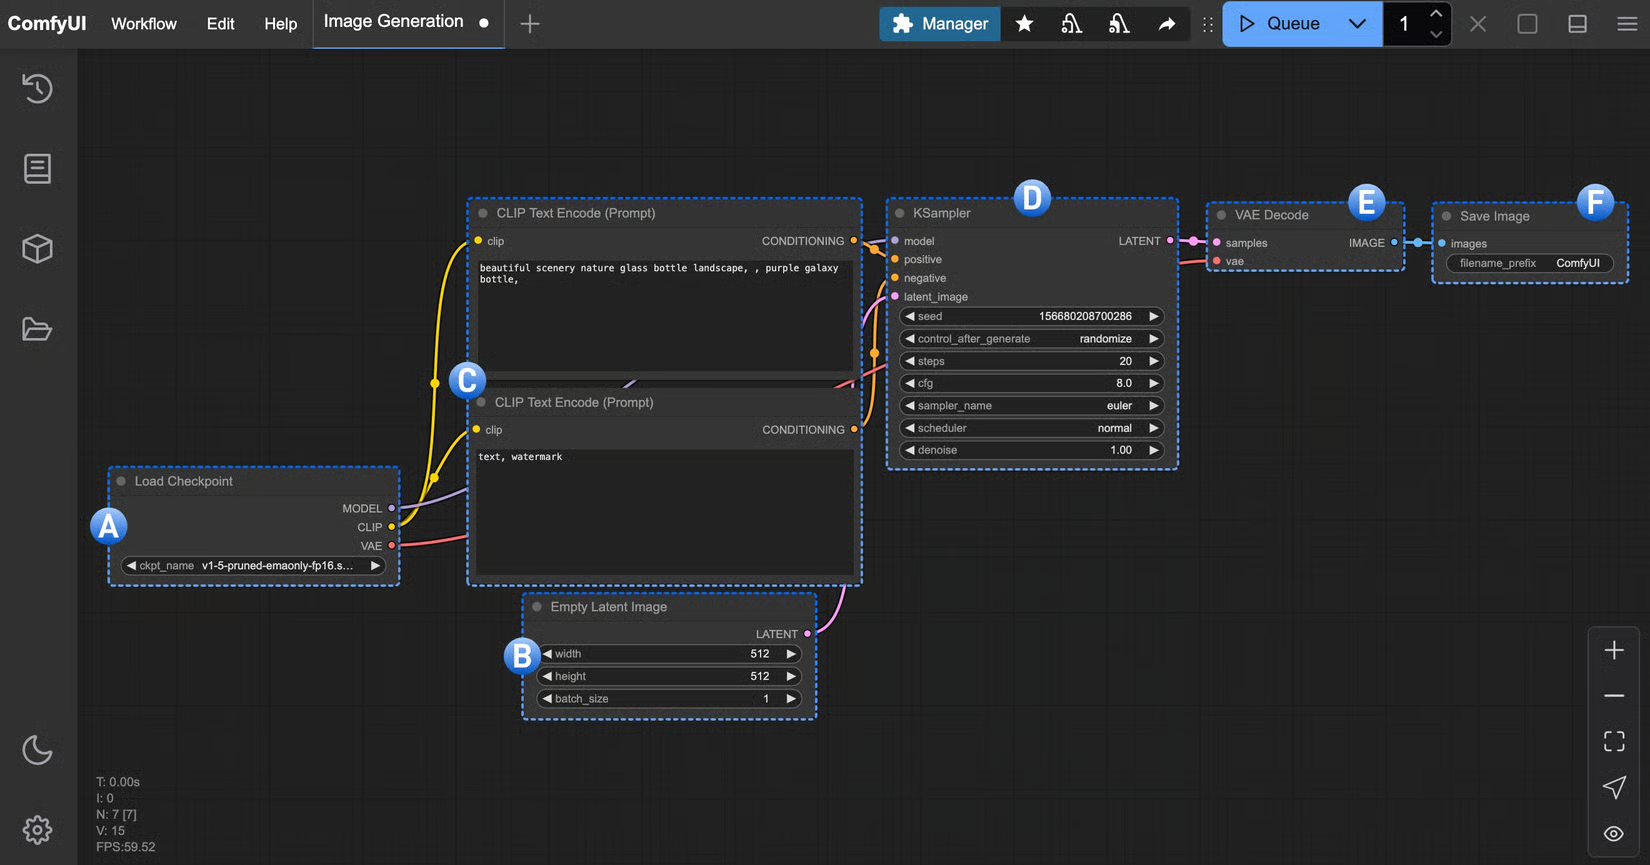
ComfyUI 공식 기본 워크플로 설명 이미지. A–F는 생성 단계의 역할을 나타내며, 화면 속 모델은 FLUX가 아닌 SD 1.5다. (출처: ComfyUI 공식 문서, 원본 확대)
내 컴퓨터에서 가능한지 확인하기
이 글의 실습 모델인 FLUX.2 Klein 4B는 Black Forest Labs가 공개한 텍스트→이미지·이미지 편집 모델이다. 제작사 모델 카드는 약 13GB VRAM을 제시한다. ComfyUI 예제에는 FP8 파일도 있지만, 실제 사용량은 워크플로·해상도·오프로딩 설정에 따라 달라진다. 따라서 특정 카드에서 “반드시 돌아간다”고 단정하지 말고, 16GB급 GPU를 여유 있는 출발점으로 보고 자신의 환경에서 확인하자. Apple Silicon은 통합 메모리를 쓰므로 PC의 VRAM 수치를 그대로 대입하지 않는다.
NVIDIA 사용자라면 Windows 터미널이나 Linux 셸에서 아래 명령으로 GPU 이름과 VRAM을 볼 수 있다.
nvidia-smi메모리가 넉넉하지 않다면 이미지 크기를 먼저 낮추거나, ComfyUI의 가벼운 SD 1.5 입문 예제로 설치와 노드 작동부터 익히는 편이 안전하다. 해당 공식 예제는 6GB급 VRAM 환경을 예시로 든다. CPU 실행도 지원하지만 느리다. 모델 파일 외에 앱·텍스트 인코더·VAE·결과 이미지가 차지할 디스크 공간도 확보하자. ComfyUI 시스템 요구사항에서 OS 지원을 확인할 수 있다.
첫 이미지를 만드는 5단계
1. Comfy Desktop을 설치한다
ComfyUI 공식 다운로드 페이지에서 운영체제에 맞는 Comfy Desktop을 받는다. 공식 안내에 따르면 Windows 10+, macOS 13+ Apple Silicon, Linux를 지원하며, 데스크톱 앱이 ComfyUI 인스턴스와 Python 환경을 관리한다. 첫 화면에서 New Install을 선택해 로컬 인스턴스를 만들고 실행한다. 설치 화면이나 선택지는 버전에 따라 바뀔 수 있다.
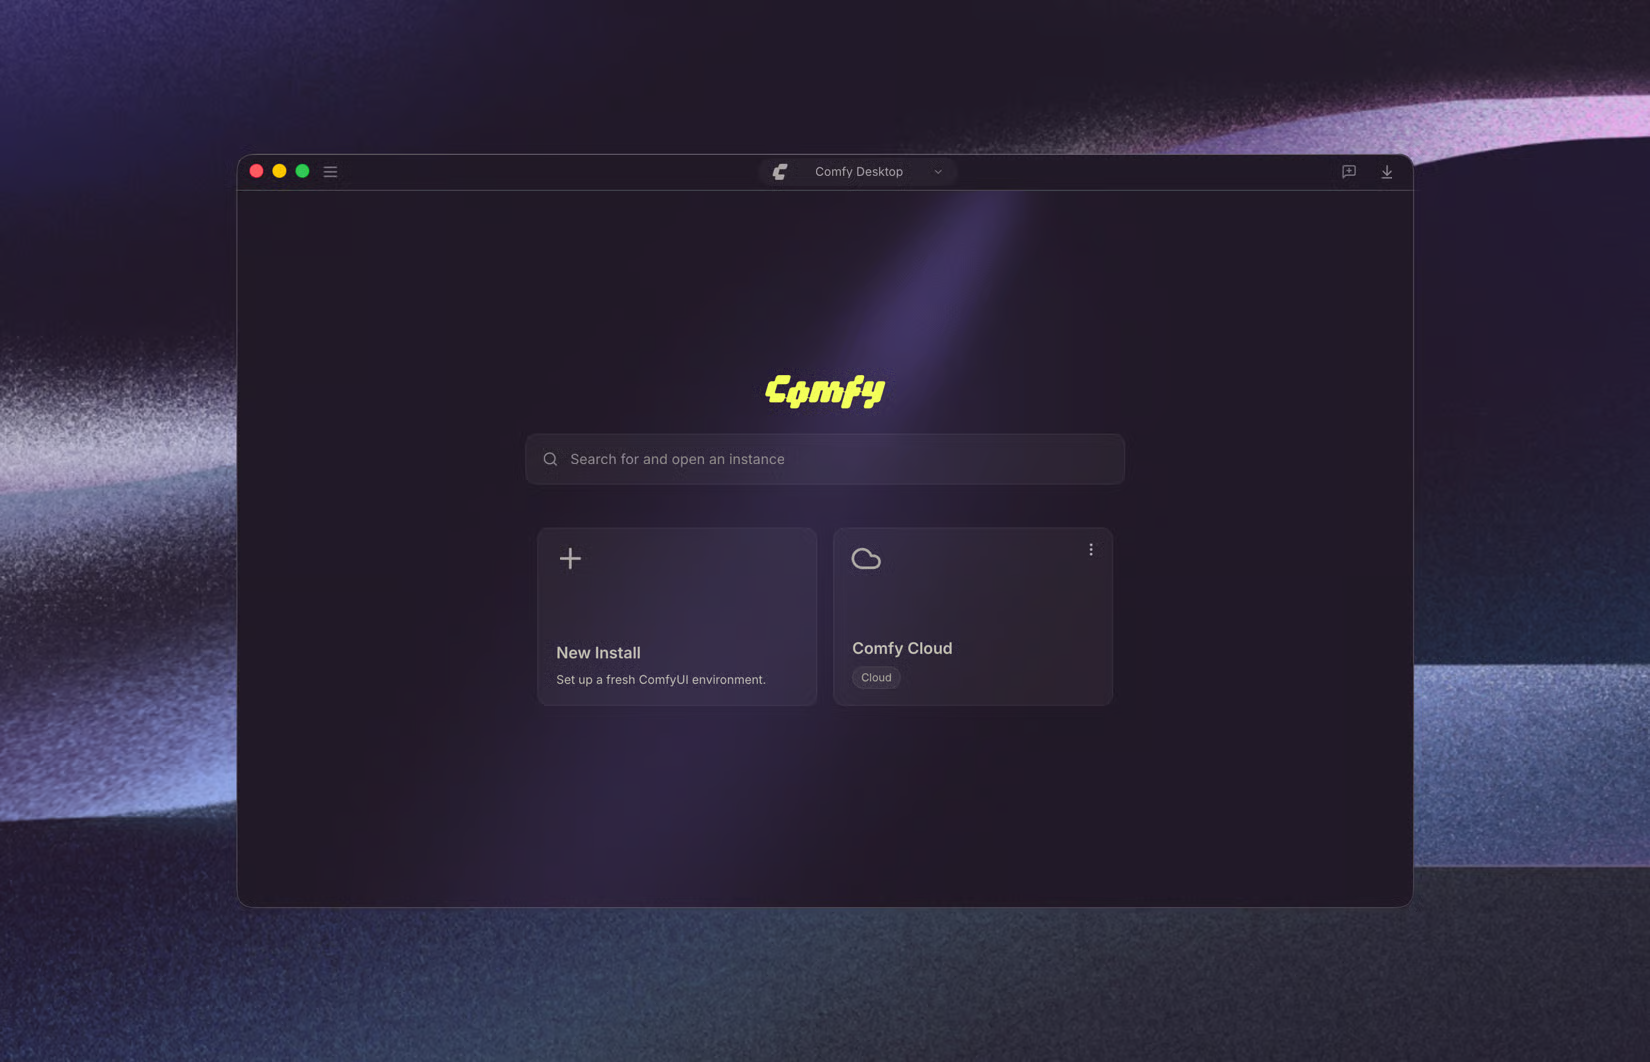
ComfyUI 공식 문서가 제공하는 Comfy Desktop 공개 화면. 이 글에서는 로컬 실행을 위해 New Install 경로를 사용한다. (출처: Comfy Desktop 공식 안내)
2. 로컬 FLUX 워크플로를 연다
FLUX.2 Klein 4B 공식 실습 페이지에서 4B Text-to-Image Workflow를 다운로드해 ComfyUI 캔버스로 끌어다 놓는다. ComfyUI의 워크플로 템플릿에서 같은 이름을 찾을 수도 있다. 이름에 Cloud, API, Partner Node가 들어간 템플릿은 로컬 추론과 다를 수 있으니, 이 실습에서는 모델 파일을 로컬에 배치하는 4B 워크플로를 고른다. 템플릿이 보이지 않으면 ComfyUI 버전을 확인한다.
3. 모델 파일 세 종류를 정확한 폴더에 둔다
공식 실습 페이지의 다운로드 링크에서 4B distilled(FP8) 모델, 텍스트 인코더, VAE를 각각 받는다. 파일명과 배치 경로는 다음과 같다. 기존 모델 파일을 임의의 사이트에서 받지 말고 공식 문서가 연결한 저장소를 확인하자.
ComfyUI/models/
├── diffusion_models/flux-2-klein-4b-fp8.safetensors
├── text_encoders/qwen_3_4b.safetensors
└── vae/flux2-vae.safetensors
여기서 qwen_3_4b.safetensors는 이 FLUX 워크플로의 텍스트 인코더다. 이름에 Qwen이 들어가도 Qwen-Image 전체 모델을 설치했다는 뜻은 아니다. 앱의 모델 목록에 파일이 보이지 않으면 배치 경로와 파일명을 다시 보고 ComfyUI를 재시작한다.
4. 프롬프트를 쓰고 작은 크기로 먼저 생성한다
템플릿의 프롬프트 칸에 아래처럼 주제, 재질, 구도, 조명, 배경을 구체적으로 적는다. 첫 실험에서는 템플릿의 샘플링 값을 유지하고, 이미지 크기를 무리하게 키우지 않는다. 실행 버튼(Queue/Run)을 누른다.
A small ceramic teapot on a pale blue table,
three-quarter view, soft morning window light,
minimal studio background, realistic material texture
동일한 구도에서 색만 바꿔 보고 싶다면 다른 조건과 seed를 고정한 채 색 표현 한 구절만 수정한다. seed는 결과를 비교하기 위한 출발점이지, 버전·장치·설정이 달라도 완전히 같은 픽셀을 보장하는 인증 번호는 아니다.
5. 결과를 저장하고 기록한다
출력 노드에서 결과를 확인한다. ComfyUI 기본 Save Image 노드는 이미지를 로컬 ComfyUI/output/에 저장한다. 잘 나온 이미지에는 사용 모델명, 프롬프트, seed, 해상도를 함께 기록해 두면 재현·수정이 쉽다. 아래 이미지는 FLUX.2 Klein 공식 문서의 예시 결과로, 이 글의 프롬프트를 실제 실행한 결과는 아니다.

ComfyUI 공식 FLUX.2 Klein 4B 안내의 예시 출력. 모델이 만들 수 있는 정지 이미지의 한 사례이며 결과 품질을 보증하지 않는다. (출처: ComfyUI 공식 FLUX.2 Klein 문서)
막힐 때는 여기부터 본다
- 모델 목록이 비어 있음: 세 파일의 폴더와 확장자를 다시 확인한다.
diffusion_models,text_encoders,vae는 서로 바꿔 넣는 폴더가 아니다. - Out of memory/OOM: 먼저 출력 해상도와 동시 실행 수를 줄인다. 오프로딩이나 더 작은 모델을 검토하고, VRAM 숫자만 보고 결과를 보장하지 않는다.
- 노드가 없음: 템플릿과 ComfyUI 버전이 맞는지 확인한다. 공식 FLUX 안내도 오래된 버전에서 템플릿·노드가 없을 수 있다고 설명한다.
- 그림 속 글자가 틀림: 모델 카드도 텍스트 왜곡 가능성을 밝힌다. 정확한 문구가 필요하면 별도의 편집 도구로 텍스트를 넣고 최종 결과를 검수한다.
- 로컬이라고 생각했는데 로그인을 요구함: API·Cloud 템플릿인지 다시 확인한다. 로컬 모델을 다운로드해 실행하는 경로와 외부 서비스를 호출하는 노드는 다르다.
첨부 대화의 Wan·Qwen·4K는 어떻게 이해할까?
Wan2.2 공식 저장소는 Wan을 영상 생성 모델로 설명하며, 텍스트→영상과 이미지→영상 작업을 제시한다. Qwen 계열 모델을 선택적으로 프롬프트 확장에 쓸 수 있다는 설명은 있지만, 그것만으로 “Wan은 Qwen 기반 이미지 모델”이라고 부를 수는 없다. 정지 이미지를 만들려면 이 글의 FLUX나 Qwen-Image 공식 모델처럼 이미지 생성용 모델을 고르는 편이 명확하다. 첨부 대화의 “Wan Image 2.1”이라는 표현은 이 실습의 공식 모델명으로 채택하지 않았다.
또한 영상 업스케일 노드를 붙인다는 말은 출력 픽셀 수를 늘리는 후처리를 뜻할 뿐, 원본에 없던 디테일이나 4K 품질을 자동 보증하지 않는다. 첫 단계에서는 영상·업스케일을 건너뛰고, 작은 정지 이미지 한 장을 안정적으로 생성하는 경험을 먼저 쌓자.
마지막으로 로컬 실행은 모든 데이터가 자동으로 비공개라는 뜻이 아니다. 모델 다운로드에는 인터넷이 필요하고, API 노드를 사용하면 외부 서비스로 입력이 전송될 수 있다. 모델별 라이선스와 상업적 사용 조건도 해당 모델 카드에서 확인하자. 이 글의 FLUX.2 Klein 4B 모델 카드는 Apache 2.0을 명시하지만, 다른 크기·변형까지 같은 조건이라고 가정하면 안 된다.
“Running a local model” usually means downloading model weights to your computer and running inference with your own GPU or system memory. Unlike clicking an image-generation button on a website, you manage installation, storage, and memory yourself. In exchange, you can choose models and repeat workflows. Rather than copy model names from the conversation in the supplied image, this guide focuses on making one still image.
First, separate the terms
- Application: Connects the model and processing steps in an interface. Here we use the local version from ComfyUI's official site.
- Image model: Weights that generate pixels from a prompt. The example is the official FLUX.2 Klein 4B model.
- Workflow: Nodes for loading a model → entering text → generating → saving. We use ComfyUI's FLUX.2 Klein example.
- VRAM: GPU memory holding model data and intermediate results during a run. Needed capacity varies with model, resolution, and precision.
ComfyUI is a node-based runtime, not an image model. In the official screen below, A–F show a basic Stable Diffusion 1.5 workflow: checkpoint, canvas, prompt, sampler, decoder, and save. The actual FLUX.2 Klein nodes and files differ, so use this picture to understand the roles, not as the FLUX setup diagram.
Official ComfyUI illustration of a basic workflow. A–F label the processing stages; the model shown is SD 1.5, not FLUX. (Source: ComfyUI documentation, view full size)
Check whether your computer is ready
FLUX.2 Klein 4B, the practice model here, is a text-to-image and editing model from Black Forest Labs. Its maker's model card states roughly 13GB of VRAM. ComfyUI's example also offers FP8 files, but real usage depends on the workflow, resolution, and offloading settings. No GPU is guaranteed to work solely from its VRAM figure; treat a 16GB-class GPU as a more comfortable starting point and verify on your machine. Apple Silicon uses unified memory, so PC VRAM figures do not transfer directly.
NVIDIA users can check the GPU name and VRAM in a Windows terminal or Linux shell:
nvidia-smi
If memory is tight, reduce the image size first or learn the installation and nodes with ComfyUI's lighter SD 1.5 beginner example. That official example cites a 6GB-VRAM-class setup. CPU execution is supported but slow. Leave disk space for the app, model, text encoder, VAE, and outputs. See ComfyUI system requirements for operating-system support.
Your first image in five steps
1. Install Comfy Desktop
Get Comfy Desktop for your OS from the official ComfyUI download page. Official guidance lists Windows 10+, macOS 13+ on Apple Silicon, and Linux; the desktop app manages ComfyUI instances and their Python environment. Select New Install on the first screen to create and launch a local instance. Screens and options may change between versions.
Public Comfy Desktop screen supplied by the official documentation. This guide follows New Install for local execution. (Source: Comfy Desktop documentation)
2. Open the local FLUX workflow
Download 4B Text-to-Image Workflow from the official FLUX.2 Klein 4B guide and drag it onto the ComfyUI canvas. You may also find the same name among ComfyUI's workflow templates. A template labeled Cloud, API, or Partner Node may call a remote service instead of running local weights, so choose the 4B workflow that places model files locally. If the template is missing, check your ComfyUI version.
3. Put three kinds of model file in the correct folders
Use links on the official guide to download the 4B distilled (FP8) model, text encoder, and VAE. The filenames and destinations are below. Check the repositories linked by the official documentation instead of using an arbitrary model-download site.
ComfyUI/models/
├── diffusion_models/flux-2-klein-4b-fp8.safetensors
├── text_encoders/qwen_3_4b.safetensors
└── vae/flux2-vae.safetensors
Here qwen_3_4b.safetensors is the text encoder in this FLUX workflow. The Qwen name does not mean you installed the entire Qwen-Image model. If a file does not appear in the model selector, recheck its name and folder, then restart ComfyUI.
4. Enter a prompt and start small
In the template's prompt field, specify subject, material, viewpoint, lighting, and background, as in this example. Keep the template's sampling settings for your first attempt and avoid an oversized image. Press Queue/Run.
A small ceramic teapot on a pale blue table,
three-quarter view, soft morning window light,
minimal studio background, realistic material texture
To change only the color while comparing the same composition, keep the other settings and the seed fixed, then edit one color phrase. A seed is a useful starting point for comparisons, not a certificate guaranteeing identical pixels across versions, hardware, and settings.
5. Save and record the result
Inspect the output node. ComfyUI's basic Save Image node writes images to local ComfyUI/output/. Keep the model name, prompt, seed, and resolution alongside a good result for later revisions. The image below is an official FLUX.2 Klein example, not an output from the prompt in this article.
Sample output from ComfyUI's official FLUX.2 Klein 4B guide. It illustrates one still-image result, not a promise of quality. (Source: ComfyUI FLUX.2 Klein documentation)
If something goes wrong
- Empty model selector: Recheck all three filenames and folders.
diffusion_models,text_encoders, andvaeare not interchangeable. - Out of memory/OOM: Lower the output resolution and number of simultaneous jobs first. Consider offloading or a smaller model; VRAM alone does not guarantee success.
- Missing nodes: Check that the template matches your ComfyUI version. The official FLUX guide notes that old versions may lack templates or nodes.
- Incorrect lettering inside the image: The model card warns that rendered text may be distorted. Add exact wording in a separate editor and review the final image.
- A supposed local workflow asks you to log in: Check whether you chose an API or Cloud template. A locally downloaded model differs from a node that calls an external service.
What about Wan, Qwen, and 4K in the supplied conversation?
The official Wan2.2 repository describes Wan as a video-generation model, including text-to-video and image-to-video tasks. Qwen-family models can optionally help with prompt extension, but that does not make Wan a “Qwen-based image model.” For a still image, choose an image model such as this guide's FLUX or the official Qwen-Image model. This guide does not treat the conversation's “Wan Image 2.1” wording as an official model name for the exercise.
A video upscaler node is post-processing that raises output pixel dimensions; it cannot automatically guarantee missing detail or 4K quality. Skip video and upscaling at first. Build a reliable one-image workflow before adding more steps.
Finally, local execution does not make everything private automatically. Initial model downloads need internet access, and API nodes can send inputs to external services. Check each model card for license and commercial-use conditions. The FLUX.2 Klein 4B card specifies Apache 2.0; do not assume another size or variant shares that license.
“运行本地模型”通常指把模型权重下载到自己的电脑,用本机 GPU 或系统内存执行推理。与网页上的一键生图不同,你需要自己管理安装、磁盘和内存,但也能自主选择模型、重复工作流程。本文不会照搬所附对话里的模型名称,而是专注于生成一张静态图片。
先分清几个名称
- **运行应用:**在界面中连接模型和处理步骤。本文使用 ComfyUI 官网的本地安装版。
- **图像模型:**根据提示词生成像素的权重。本文示例为 FLUX.2 Klein 4B 官方模型。
- **工作流:**串起加载模型 → 输入文字 → 生成 → 保存的节点。本文使用 ComfyUI 的 FLUX.2 Klein 示例。
- **VRAM(显存):**GPU 运行时存放模型和中间结果的内存,需求随模型、分辨率和精度而变。
ComfyUI 不是模型,而是基于节点的运行环境。下方官方画面的 A–F 展示了 Stable Diffusion 1.5 基础示例中的检查点、画布、提示词、采样器、解码器和保存步骤。FLUX.2 Klein 实际使用的节点与文件不同,这张图只用于理解概念。
ComfyUI 官方基础工作流示意图。A–F 标注处理阶段;图中模型是 SD 1.5,不是 FLUX。(来源:ComfyUI 官方文档,查看原图)
确认电脑能否运行
本文练习使用的 FLUX.2 Klein 4B 是 Black Forest Labs 发布的文生图及图像编辑模型。开发者模型卡给出约 13GB 显存的参考值。ComfyUI 示例也提供 FP8 文件,但实际用量取决于工作流、分辨率和卸载设置。不能仅凭显存数字保证一定运行;可把16GB 级 GPU 视为更从容的起点,再在自己的机器上验证。Apple Silicon 使用统一内存,不能直接套用 PC 的显存数字。
NVIDIA 用户可在 Windows 终端或 Linux shell 查看 GPU 名称和显存:
nvidia-smi
如果内存不足,先降低图片尺寸,或用 ComfyUI 较轻量的 SD 1.5 入门示例学习安装和节点。该官方示例以 6GB 级显存为例。CPU 也能运行,但速度较慢。还要给应用、模型、文本编码器、VAE 和输出文件留足磁盘空间。系统支持情况见 ComfyUI 系统要求。
五步生成第一张图
1. 安装 Comfy Desktop
从 ComfyUI 官方下载页获取适合系统的 Comfy Desktop。官方说明支持 Windows 10+、macOS 13+ Apple Silicon 和 Linux;桌面应用会管理 ComfyUI 实例及 Python 环境。在初始画面选择 New Install,创建并启动本地实例。界面和选项可能随版本变化。
ComfyUI 官方文档提供的 Comfy Desktop 公开界面。本文选择 New Install 路径在本机运行。(来源:Comfy Desktop 官方说明)
2. 打开本地 FLUX 工作流
从 FLUX.2 Klein 4B 官方教程下载 4B Text-to-Image Workflow,拖入 ComfyUI 画布。也可以在 ComfyUI 工作流模板中寻找同名项目。标有 Cloud、API 或 Partner Node 的模板可能调用远程服务;本练习要选把模型文件放在本地的 4B 工作流。若找不到模板,先检查 ComfyUI 版本。
3. 将三类模型文件放进正确文件夹
通过官方教程链接下载 **4B distilled(FP8)**模型、文本编码器和 VAE。文件名及路径如下。不要从不明网站获取模型;请核对官方文档指向的仓库。
ComfyUI/models/
├── diffusion_models/flux-2-klein-4b-fp8.safetensors
├── text_encoders/qwen_3_4b.safetensors
└── vae/flux2-vae.safetensors
这里的 qwen_3_4b.safetensors 是该 FLUX 工作流使用的文本编码器。文件名含 Qwen,不代表已经安装完整的 Qwen-Image 模型。如果模型列表没有显示文件,复核名称和文件夹,再重启 ComfyUI。
4. 输入提示词,先用较小尺寸试运行
在模板提示词框中具体描述主体、材质、视角、光线和背景。第一次先保留模板的采样设置,不要把图片尺寸设得过大,然后点击 Queue/Run。
A small ceramic teapot on a pale blue table,
three-quarter view, soft morning window light,
minimal studio background, realistic material texture
若想在相同构图下只调整颜色,可固定其他设置和 seed(随机种子),只修改一个颜色短语。种子有助于比较,但不能保证在不同版本、设备和设置下得到完全相同的像素。
5. 保存并记录结果
在输出节点检查结果。ComfyUI 基础 Save Image 节点会把图片保存在本地 ComfyUI/output/。保留模型名、提示词、seed 和分辨率,便于日后复现或修改。下图是 FLUX.2 Klein 官方示例结果,不是本文提示词实际运行的输出。
ComfyUI 官方 FLUX.2 Klein 4B 教程中的示例输出,仅展示一种静态图片结果,不保证每次的质量。(来源:ComfyUI FLUX.2 Klein 官方文档)
遇到问题先检查这里
- **模型列表为空:**复核三个文件的名称与路径。
diffusion_models、text_encoders、vae不能互换。 - **显存不足/OOM:**先降低输出分辨率和并行任务数,再考虑卸载或更小的模型;显存数字本身不能保证成功。
- **缺少节点:**检查模板是否与 ComfyUI 版本匹配。官方 FLUX 教程也提示旧版本可能缺少模板或节点。
- **图中的文字不准确:**模型卡说明文字可能变形。需要准确文案时,用独立编辑工具添加并检查成品。
- **说是本地却要求登录:**确认是否误选 API 或 Cloud 模板。本地下载模型与调用外部服务的节点不同。
所附对话中的 Wan、Qwen 与 4K 是什么?
Wan2.2 官方仓库将 Wan 介绍为视频生成模型,提供文生视频和图生视频任务。Qwen 系列模型可选择用于扩展提示词,但这不等于 Wan 是“基于 Qwen 的图像模型”。要生成静态图片,选本文的 FLUX 或 Qwen-Image 官方模型等图像模型更明确。本文不把对话中的“Wan Image 2.1”当作本练习的官方模型名称。
视频放大节点属于提高输出像素尺寸的后处理,不能自动保证补出原本不存在的细节或达到 4K 画质。入门时先跳过视频和放大,稳定生成一张小图后再加步骤。
最后,本地运行不意味着所有数据自动保密。最初下载模型需要联网;API 节点可能把输入发送到外部服务。还应逐一核对模型卡中的许可与商业使用条件。本文的 FLUX.2 Klein 4B 模型卡标注 Apache 2.0,但不要假定其他大小或变体的许可相同。
「ローカルモデルで作る」とは通常、モデルの重みを自分のPCにダウンロードし、自分のGPUまたはシステムメモリで推論を実行することです。Webサービスの生成ボタンと違って、インストール、ストレージ、メモリを自分で管理する必要があります。その代わり、モデルや手順を選んで繰り返し試せます。ここでは添付された会話のモデル名をそのまま採用せず、静止画像を1枚作る方法に絞ります。
まず用語を整理する
- **実行アプリ:**モデルと処理を画面上でつなぎます。ここではComfyUI公式サイトのローカル版を使います。
- **画像モデル:**プロンプトから画像を生成する重みです。例はFLUX.2 Klein 4B公式モデルです。
- **ワークフロー:**モデル読込 → 入力 → 生成 → 保存のノード構成です。ComfyUIのFLUX.2 Kleinサンプルを使います。
- **VRAM:**実行中のモデルと中間結果を置くGPUメモリで、必要量はモデル、解像度、精度で変わります。
ComfyUIはモデルそのものではなく、ノード型の実行環境です。下の公式画面のA〜Fは、Stable Diffusion 1.5の基本例で、チェックポイント、キャンバス、プロンプト、サンプラー、デコーダー、保存を示します。FLUX.2 Kleinのノードとファイル構成は異なるため、役割を理解する図として見てください。
ComfyUI公式の基本ワークフロー図。A〜Fは処理の段階を表し、画面のモデルはFLUXではなくSD 1.5です。(出典:ComfyUI公式ドキュメント、原寸で見る)
手元のPCで動くか確認する
実習で使う FLUX.2 Klein 4B は、Black Forest Labsが公開したテキストからの画像生成・画像編集モデルです。開発元のモデルカードには約 13GBのVRAM と記載されています。ComfyUIの例にはFP8ファイルもありますが、実際の使用量はワークフロー、解像度、オフロード設定で変わります。VRAM容量だけで動作を断言せず、16GB級GPUを比較的余裕のある出発点として手元で確認してください。Apple Siliconはユニファイドメモリなので、PCのVRAM値をそのまま当てはめられません。
NVIDIAユーザーはWindowsのターミナルまたはLinuxのシェルでGPU名とVRAMを確認できます。
nvidia-smi
メモリが少ない場合は、まず画像サイズを下げるか、ComfyUIの軽量なSD 1.5入門例でインストールとノードの使い方を学びましょう。この公式例は6GB級VRAM環境を挙げています。CPUでも動きますが低速です。アプリ、モデル、テキストエンコーダー、VAE、出力画像のディスク容量も必要です。OSの対応状況はComfyUIシステム要件で確認できます。
5つの手順で最初の画像を作る
1. Comfy Desktopをインストール
ComfyUI公式ダウンロードページからOSに合うComfy Desktopを入手します。公式案内ではWindows 10以降、macOS 13以降のApple Silicon、Linuxに対応し、デスクトップアプリがComfyUIインスタンスとPython環境を管理します。最初の画面で New Install を選び、ローカルインスタンスを作成・起動します。画面や選択肢はバージョンで変わる場合があります。
ComfyUI公式ドキュメントが公開するComfy Desktop画面。この記事ではローカル実行のため New Install を使います。(出典:Comfy Desktop公式案内)
2. ローカルFLUXワークフローを開く
FLUX.2 Klein 4B公式ガイドから 4B Text-to-Image Workflow をダウンロードし、ComfyUIのキャンバスへドラッグします。ComfyUIのワークフローテンプレートにも同名のものがあります。Cloud、API、Partner Node と付くテンプレートはローカル推論ではなく外部サービスを呼び出す場合があるため、モデルファイルをローカルに置く4Bワークフローを選びます。見当たらなければComfyUIのバージョンを確認します。
3. 3種類のモデルファイルを正しいフォルダーへ
公式ガイドのリンクから **4B distilled(FP8)**モデル、テキストエンコーダー、VAEを取得します。ファイル名と配置先は次のとおりです。不明な配布サイトから入手せず、公式ガイドが示すリポジトリを確認してください。
ComfyUI/models/
├── diffusion_models/flux-2-klein-4b-fp8.safetensors
├── text_encoders/qwen_3_4b.safetensors
└── vae/flux2-vae.safetensors
qwen_3_4b.safetensors はこのFLUXワークフローのテキストエンコーダーです。名前にQwenがあっても、Qwen-Image全体をインストールしたわけではありません。モデル一覧に表示されなければファイル名と場所を見直し、ComfyUIを再起動します。
4. プロンプトを入力し、小さめの画像で試す
テンプレートの入力欄に、次のように被写体、素材、視点、光、背景を具体的に書きます。最初はサンプリング設定をテンプレートのままにし、画像を大きくしすぎず、Queue/Runを押します。
A small ceramic teapot on a pale blue table,
three-quarter view, soft morning window light,
minimal studio background, realistic material texture
同じ構図で色だけ比べるなら、ほかの設定と seed を固定して色の表現を一箇所だけ変えます。seedは比較の出発点であり、バージョンや機材、設定が違っても完全に同じピクセルになる保証ではありません。
5. 結果を保存し、条件を記録する
出力ノードで画像を確認します。ComfyUIの基本 Save Image ノードはローカルの ComfyUI/output/ に保存します。良い結果のモデル名、プロンプト、seed、解像度を記録すると、後の再現や修正に役立ちます。下の画像は FLUX.2 Kleinの公式サンプルで、この記事のプロンプトを実行した結果ではありません。
ComfyUI公式FLUX.2 Klein 4Bガイドの出力例。静止画像の一例であり、品質を保証するものではありません。(出典:ComfyUI公式FLUX.2 Kleinガイド)
うまくいかないとき
- **モデル一覧が空:**3ファイルの名前とフォルダーを再確認します。
diffusion_models、text_encoders、vaeは交換できません。 - **メモリ不足/OOM:**まず出力解像度と同時実行数を下げます。オフロードや小型モデルも検討し、VRAMの数字だけで成功を判断しません。
- **ノードが見つからない:**テンプレートとComfyUIのバージョンを確認します。公式FLUXガイドも旧版では不足する場合があると説明します。
- **画像内の文字が間違う:**モデルカードにも文字が崩れる可能性が示されています。正確な文言は別の編集ツールで追加し、完成版を確認します。
- **ローカルのつもりがログインを求められる:**APIやCloudのテンプレートを選んでいないか確認します。ローカルモデルと外部サービスを呼ぶノードは別です。
添付の会話にあるWan、Qwen、4Kとは?
Wan2.2公式リポジトリはWanを動画生成モデルと説明し、テキストから動画、画像から動画のタスクを挙げています。Qwen系モデルをプロンプト拡張に任意で使えますが、それだけでWanを「Qwenベースの画像モデル」とは呼べません。静止画像なら、この記事のFLUXやQwen-Image公式モデルのような画像生成用モデルを選ぶほうが明確です。会話中の「Wan Image 2.1」は、この実習の正式なモデル名として採用していません。
動画のアップスケールノードは出力のピクセル数を増やす後処理で、元にないディテールや4K画質を自動的に保証するものではありません。まず動画とアップスケールを省き、小さな静止画像を安定して作ることから始めましょう。
最後に、ローカル実行でもすべてが自動的に非公開になるわけではありません。最初のモデル取得にはインターネットが必要で、APIノードは入力を外部サービスに送ることがあります。ライセンスと商用利用条件はモデルカードごとに確認してください。この記事のFLUX.2 Klein 4B はApache 2.0と明記されていますが、別のサイズや派生版も同じとは限りません。
«Usar un modelo local» suele significar descargar sus pesos al ordenador y ejecutar la inferencia con tu propia GPU o memoria del sistema. A diferencia de pulsar un botón de generación en una web, debes ocuparte de la instalación, el almacenamiento y la memoria. A cambio, puedes elegir modelos y repetir el proceso. En vez de seguir sin más los nombres de modelos de la conversación adjunta, esta guía se centra en crear una imagen fija.
Primero, distingue los conceptos
- Aplicación: conecta el modelo y los pasos en una interfaz. Aquí usamos la versión local del sitio oficial de ComfyUI.
- Modelo de imagen: pesos que generan píxeles a partir de una instrucción. El ejemplo es el modelo oficial FLUX.2 Klein 4B.
- Flujo de trabajo: nodos para cargar → describir → generar → guardar. Usamos el ejemplo de FLUX.2 Klein en ComfyUI.
- VRAM: memoria de la GPU para el modelo y los resultados intermedios. La cantidad necesaria depende del modelo, la resolución y la precisión.
ComfyUI no es el modelo, sino un entorno de ejecución basado en nodos. En la pantalla oficial de abajo, A–F muestran un ejemplo básico de Stable Diffusion 1.5: checkpoint, lienzo, texto, muestreador, decodificador y guardado. Los nodos y archivos reales de FLUX.2 Klein son distintos: usa esta imagen solo para entender el esquema.
Ilustración oficial de un flujo básico de ComfyUI. A–F identifican las etapas; el modelo de la captura es SD 1.5, no FLUX. (Fuente: documentación de ComfyUI, ver a tamaño completo)
Comprueba si tu equipo está preparado
FLUX.2 Klein 4B, el modelo de esta práctica, genera y edita imágenes a partir de texto. Su ficha del fabricante, Black Forest Labs, indica aproximadamente 13 GB de VRAM. El ejemplo de ComfyUI también ofrece archivos FP8, pero el consumo real depende del flujo, la resolución y la descarga de componentes a memoria principal. Una cifra de VRAM no garantiza que funcione: toma una GPU de clase 16 GB como punto de partida más holgado y compruébalo en tu equipo. Apple Silicon utiliza memoria unificada, así que las cifras de VRAM de PC no se trasladan directamente.
Si tienes NVIDIA, consulta el nombre de la GPU y su VRAM en una terminal de Windows o Linux:
nvidia-smi
Si dispones de poca memoria, reduce primero el tamaño de la imagen o aprende la instalación y los nodos con el ejemplo básico y más ligero de SD 1.5 de ComfyUI. Ese ejemplo oficial menciona una configuración de clase 6 GB de VRAM. También se admite CPU, pero es lenta. Reserva disco para la aplicación, el modelo, el codificador de texto, el VAE y los resultados. Consulta los sistemas compatibles en los requisitos de ComfyUI.
Tu primera imagen en cinco pasos
1. Instala Comfy Desktop
Descarga Comfy Desktop para tu sistema desde la página oficial de ComfyUI. La documentación indica compatibilidad con Windows 10+, macOS 13+ con Apple Silicon y Linux; la aplicación de escritorio administra las instancias de ComfyUI y su entorno Python. En la primera pantalla, elige New Install para crear e iniciar una instancia local. La interfaz puede variar entre versiones.
Pantalla pública de Comfy Desktop proporcionada por su documentación oficial. Esta guía usa New Install para ejecutar el modelo localmente. (Fuente: documentación de Comfy Desktop)
2. Abre el flujo local de FLUX
Descarga 4B Text-to-Image Workflow desde la guía oficial de FLUX.2 Klein 4B y arrástralo al lienzo de ComfyUI. También puedes buscarlo por ese nombre entre las plantillas de ComfyUI. Las plantillas marcadas como Cloud, API o Partner Node pueden llamar a un servicio remoto; para esta práctica, elige el flujo 4B que coloca los archivos del modelo en tu equipo. Si no aparece, revisa la versión de ComfyUI.
3. Coloca tres tipos de archivo en sus carpetas
Descarga desde los enlaces de la guía oficial el modelo 4B distilled (FP8), el codificador de texto y el VAE. Estos son sus nombres y destinos. Comprueba los repositorios enlazados por la documentación, no un sitio de descargas cualquiera.
ComfyUI/models/
├── diffusion_models/flux-2-klein-4b-fp8.safetensors
├── text_encoders/qwen_3_4b.safetensors
└── vae/flux2-vae.safetensors
Aquí qwen_3_4b.safetensors es el codificador de texto de este flujo FLUX. Que incluya Qwen en el nombre no significa que hayas instalado todo el modelo Qwen-Image. Si no aparece un archivo en el selector, revisa el nombre y la carpeta y reinicia ComfyUI.
4. Escribe una descripción y empieza con una imagen pequeña
En el campo del flujo, concreta sujeto, material, perspectiva, iluminación y fondo como en este ejemplo. En el primer intento, conserva los valores de muestreo de la plantilla, no elijas un tamaño excesivo y pulsa Queue/Run.
A small ceramic teapot on a pale blue table,
three-quarter view, soft morning window light,
minimal studio background, realistic material texture
Si quieres comparar colores con la misma composición, mantén las demás opciones y la seed y cambia solo una frase sobre el color. La seed ayuda a comparar, pero no garantiza píxeles idénticos entre versiones, dispositivos y configuraciones.
5. Guarda y documenta el resultado
Revisa el nodo de salida. El nodo básico Save Image guarda las imágenes en ComfyUI/output/ del equipo. Anota el modelo, la descripción, la seed y la resolución de las imágenes que te gusten para poder revisarlas. La imagen siguiente es un resultado de ejemplo oficial de FLUX.2 Klein, no una generación realizada con la descripción de este artículo.
Resultado de muestra de la guía oficial de ComfyUI sobre FLUX.2 Klein 4B. Ilustra una imagen fija, no garantiza una calidad determinada. (Fuente: documentación de FLUX.2 Klein en ComfyUI)
Si algo falla, empieza por aquí
- Selector de modelos vacío: comprueba los tres nombres y carpetas.
diffusion_models,text_encodersyvaeno son intercambiables. - Falta de memoria/OOM: reduce primero la resolución y los trabajos simultáneos. Considera descargar componentes a RAM o usar un modelo menor; la VRAM por sí sola no garantiza el éxito.
- Faltan nodos: comprueba que la plantilla corresponda a tu versión de ComfyUI. La guía oficial de FLUX advierte de que versiones antiguas pueden carecer de plantillas o nodos.
- Las letras de la imagen salen mal: la ficha del modelo advierte de posibles distorsiones. Si necesitas un texto exacto, añádelo en otro editor y revisa la pieza final.
- Te pide iniciar sesión pese a querer trabajar en local: comprueba que no sea una plantilla API o Cloud. Un modelo descargado localmente es distinto de un nodo que llama a un servicio externo.
¿Qué significan Wan, Qwen y 4K en la conversación adjunta?
El repositorio oficial de Wan2.2 describe Wan como un modelo de generación de vídeo, con tareas de texto a vídeo e imagen a vídeo. Los modelos de la familia Qwen pueden usarse opcionalmente para ampliar instrucciones, pero eso no convierte a Wan en un «modelo de imagen basado en Qwen». Para una imagen fija, resulta más claro elegir un modelo de imagen como FLUX o el modelo oficial Qwen-Image. Esta guía no adopta «Wan Image 2.1», expresión de la conversación, como nombre oficial del modelo utilizado.
Un nodo de ampliación de vídeo es posprocesamiento que aumenta las dimensiones en píxeles: no garantiza automáticamente recuperar detalles ausentes ni calidad 4K. Deja vídeo y ampliación para más adelante y aprende primero a generar una imagen pequeña de forma fiable.
Por último, ejecutar en local no hace que todo sea privado automáticamente. La descarga inicial requiere internet y los nodos API pueden enviar datos a servicios externos. Revisa en cada ficha la licencia y las condiciones comerciales. La ficha de FLUX.2 Klein 4B indica Apache 2.0; no supongas que otros tamaños o variantes tienen la misma licencia.