Claude Code 프로젝트 시작법: 재사용 가능한 하네스와 환경설정
새 프로젝트에서 Claude Code 공식 웹사이트를 열자마자 플러그인과 긴 지침부터 채울 필요는 없다. 먼저 프로젝트가 무엇을 만드는지, 실제 실행·검증 명령이 무엇인지, 어디까지 바꿔도 되는지를 Claude와 사람이 함께 확인할 수 있게 만들면 된다. 그 위에 반복해서 드러나는 문제만 자동화한다.
이 글은 2026년 10월 13일 기준 공식 빠른 시작, 모범 사례, 확장 기능 안내를 바탕으로 작성했다. 끝에는 다른 저장소에 복사해 수정할 수 있는 시작 템플릿 ZIP도 제공한다.
핵심 원칙: 작은 하네스를 먼저 만든다
여기서 하네스 엔지니어링은 AI에게 긴 프롬프트를 주는 일이 아니다. 프로젝트 설명, 도구 접근, 작업 경계, 테스트와 리뷰를 연결해 변경 사항을 다시 확인할 수 있게 만드는 실무 방식이다. Anthropic의 장기 실행 에이전트 하네스 연구는 작은 작업 단위와 진행 기록, 실제 동작 검증의 중요성을 보여 준다. 다만 그 연구는 Agent SDK 실험이므로, 아래 구성은 그것을 Claude Code 프로젝트에 가볍게 적용한 이 글의 제안이다.
| 질문 | 시작 구성 → 필요할 때 확장 |
|---|---|
| 무엇을 만들고 누구를 위한 것인가? | README.md, docs/project-brief.md → 상세 기획 문서 |
| 매 세션 어떤 사실을 알아야 하나? | 짧은 CLAUDE.md 또는 AGENTS.md → 경로별 .claude/rules/ |
| 어떻게 성공을 확인하나? | 실제 테스트·빌드 명령과 완료 기준 → hook, CI, 독립 리뷰 |
| 반복 절차가 생겼나? | 요청에 명시 → 프로젝트 skill |
| 외부 시스템이 필요한가? | 기본 연결 없음 → 최소 권한 MCP |
| 여러 프로젝트에 같은 기능을 배포하나? | 개별 설정 → plugin |
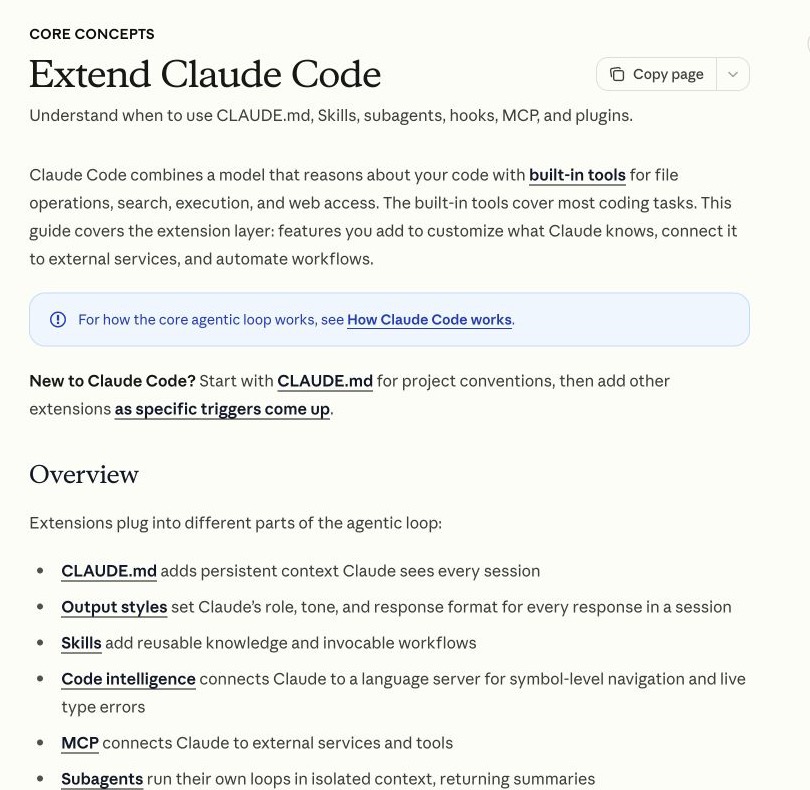
Anthropic의 Claude Code 확장 기능 공식 문서 공개 화면. 상시 지침에서 시작해 필요한 확장만 추가하는 구조를 보여 준다. (2026-10-13 캡처)
공식 문서도 처음에는 CLAUDE.md로 관례를 기록하고, 특정 필요가 생길 때 확장하라고 안내한다. 플러그인 수가 많거나 CLAUDE.md가 길다고 프로젝트 이해도가 자동으로 높아지지는 않는다.
1. 설치하고 저장소 루트에서 시작하기
macOS·Linux·WSL에서는 공식 문서의 권장 네이티브 설치 명령을 사용한다. 설치 스크립트를 실행하기 전에 도메인이 공식 claude.ai인지 확인하고, 팀 보안 정책이 있으면 그 배포 방법을 따른다. Windows나 Homebrew를 쓰는 경우에는 운영체제별 공식 설치 방법을 참고한다.
curl -fsSL https://claude.ai/install.sh | bash
claude --version
cd /path/to/your/project
claude
첫 실행에서는 계정 로그인 안내가 나온다. Claude 구독, Console/API 계정 또는 지원되는 클라우드 제공자 접근 권한이 필요하다. 세션 안에서 /help로 사용 가능한 명령을 확인한다.
기존 코드가 있다면 먼저 이렇게 요청한다.
파일을 수정하지 말고 이 저장소의 목적, 진입점, 실제 실행·테스트·빌드 명령,
주요 디렉터리, 현재 실패하는 검사와 모르는 점을 찾아 요약해 줘.
추측한 내용과 파일에서 확인한 내용을 구분해 줘.
그 다음 /init으로 프로젝트 지침 초안을 만든다. 이미 CLAUDE.md가 있으면 덮어쓰는 대신 개선안을 제시한다. 생성된 명령은 직접 실행해 맞는지 확인하고, /context의 Memory files에서 실제 로드 여부를 살핀다. 새 저장소라서 아직 테스트가 없다면 테스트 명령을 지어내지 말고, 첫 번째 작은 기능과 함께 통과·실패가 구분되는 최소 검사를 만든다.
2. 프로젝트 내용을 어디에 담을까?
아래 구조는 Claude Code가 강제하는 표준이 아니라, 사람과 에이전트가 함께 쓰기 좋은 이식 가능한 출발점이다.
your-project/
├── README.md                   # 사람이 읽는 제품·실행 개요
├── CLAUDE.md                   # 매 세션 필요한 짧은 규칙
├── docs/
│   ├── project-brief.md        # 사용자, 문제, 범위, 성공 기준
│   └── architecture.md         # 모듈 경계와 중요한 결정
└── .claude/
    ├── settings.json           # 필요할 때만 팀 공용 권한·hook 설정
└── skills/ # 반복 절차가 생길 때 추가README.md에는 사람이 프로젝트를 실행하고 이해하는 데 필요한 개요를, project-brief.md에는 제품 목적과 이번에 만들지 않을 것을 쓴다. CLAUDE.md는 Claude가 매 세션 알아야 할 짧은 운영 규칙만 둔다. 상세 API 명세나 긴 작업 절차를 그대로 옮기지 않는다.
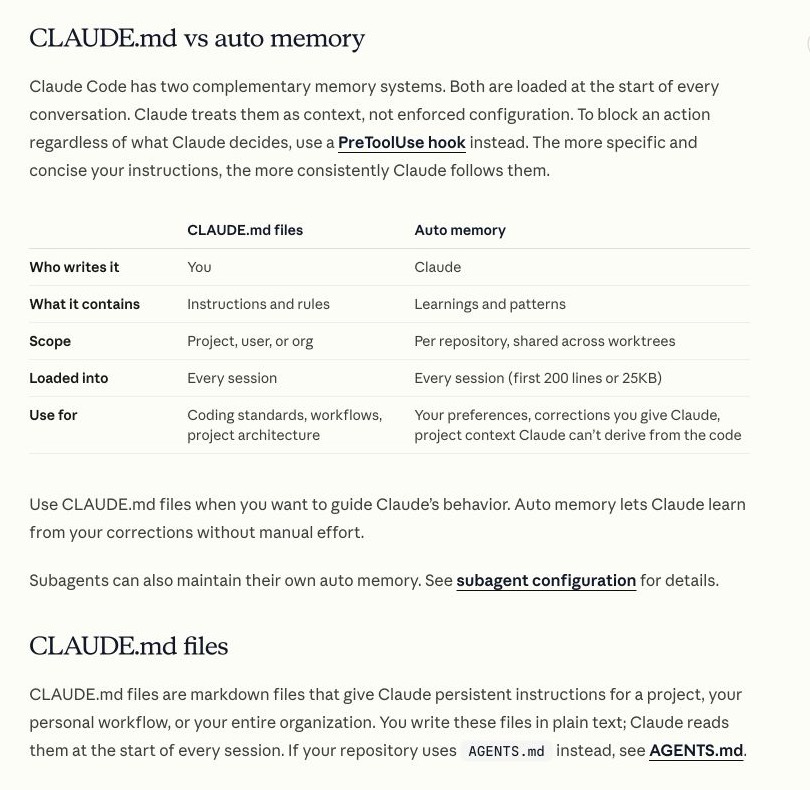
Anthropic의 프로젝트 기억 공식 문서 공개 화면. 사람이 작성하는 CLAUDE.md와 Claude가 축적하는 자동 메모리의 역할을 구분한다. (2026-10-13 캡처)
공식 문서는 CLAUDE.md를 200줄 미만을 목표로 짧고 구체적으로 유지하라고 권한다. @docs/... import는 파일을 나누는 데는 유용하지만, 시작 시 내용을 함께 읽으므로 컨텍스트를 절약하지 않는다. 긴 문서는 평소에는 경로만 알려 주고 해당 작업에서 읽게 한다. 여러 코딩 도구가 공통으로 쓰는 AGENTS.md가 이미 있다면 최근 Claude Code는 직접 읽을 수 있다. 다만 프로젝트나 상위 디렉터리에 CLAUDE.md 또는 CLAUDE.local.md가 있으면 기본 설정에서는 AGENTS.md 대신 그것을 읽는다. 둘을 함께 유지할 때는 CLAUDE.md에서 @AGENTS.md를 가져오거나 /config의 Project instructions 설정을 확인한다.
3. 바로 복사할 수 있는 두 문서
먼저 docs/project-brief.md에 제품의 내용을 적는다. 아래 대괄호는 프로젝트에 맞게 바꾸고, 모르면 미정이라고 쓴다. 모호한 부분을 그럴듯하게 채우는 것보다 확인할 질문으로 남기는 편이 낫다.
# Project brief

## 목적
- 대상 사용자: [누가 사용하나]
- 해결할 문제: [현재 어떤 불편이 있나]
- 성공한 상태: [사용자가 무엇을 할 수 있나]

## 범위
- 이번에 포함: [핵심 흐름 1~3개]
- 이번에 제외: [명시적인 비목표]

## 제약
- 기술/운영 제약: [스택, 지원 환경, 일정 등]
- 민감 정보: [실제 값이 아닌 환경변수 이름과 보관 위치만]

## 첫 완료 기준
- 동작 확인: [재현 가능한 시나리오]
- 자동 검사: [실제로 실행되는 테스트/빌드 명령]
- 사람 검토: [결정이 필요한 항목]
다음은 루트 CLAUDE.md의 최소 예시다. 명령과 경로가 실제 저장소와 일치하도록 고친 뒤 사용한다.
# Project operating guide

## Purpose
- Build: [one-sentence product goal]
- Read `docs/project-brief.md` when product scope is relevant.
- Read `docs/architecture.md` when changing module boundaries.

## Verified commands
- Dev: [actual command]
- Targeted test: [actual command]
- Build or typecheck: [actual command]

## Boundaries
- Follow existing patterns; avoid unrelated refactors.
- Do not add dependencies or change public APIs without explaining why.
- Do not put secrets or real customer data in files or output.
- Keep generated files and deployment settings untouched unless the task needs them.

## Done means
- Run the smallest relevant check, then the required broader checks.
- Report changed files, commands run, results, and remaining risks.
- Show the diff for review before commit or deployment.
여기서 Read docs/...는 경로를 언급한 것이지 전체 파일을 자동 import하는 지시가 아니다. 프로젝트 규모가 커지면 파일 종류별 규칙을 .claude/rules/의 paths: frontmatter로 분리하고, 여러 단계의 반복 작업은 .claude/skills/<name>/SKILL.md로 옮긴다. 처음부터 빈 skill 파일을 여러 개 만들 필요는 없다.
4. 설정과 권한은 팀 공용·개인을 나누기
공식 설정 범위 안내에 따르면 ~/.claude/settings.json은 개인 공통, .claude/settings.json은 저장소에 공유할 팀 설정, .claude/settings.local.json은 현재 프로젝트의 개인 설정이다. 로컬 파일을 직접 만들었다면 Git 제외 규칙을 확인한다. 프로젝트별 개인 지침은 CLAUDE.local.md에 둘 수 있지만 이것도 Git에서 제외한다.
팀 설정은 필요한 항목만 넣는다. 예를 들어 다음은 Claude의 직접 파일 읽기 도구가 루트 .env 파일을 여는 것을 차단하는 출발 예시다.
{
  "permissions": {
    "deny": ["Read(./.env)", "Read(./.env.*)"]
  }
}
이 규칙을 운영체제 수준의 비밀 보호로 오해하면 안 된다. 다른 명령이나 스크립트를 통한 간접 접근까지 막는 샌드박스는 아니므로, 실무 비밀은 저장소에 넣지 않고 별도 보관·최소 권한·격리 환경을 병행한다. bypassPermissions를 편의상 켜 두는 방식도 피한다. 승인 정책과 실행 환경은 프로젝트의 위험도에 맞춰 공식 권한 문서에서 확인한다.
5. 첫 번째 작업은 탐색 → 작은 변경 → 검증
새 기능을 한 번에 크게 맡기기보다 파일, 성공 조건, 제외 범위와 검사 방법을 한 작업 단위로 묶는다. 아래 텍스트를 첫 작업 요청의 틀로 재사용할 수 있다.
@docs/project-brief.md를 읽고 이번 작업과 관련된 코드만 먼저 찾아 줘.

목표: [사용자가 얻게 될 결과]
현재 상태: [버그 증상 또는 빈 기능]
성공 조건: [입력/출력 또는 화면에서 확인할 결과]
범위: [수정 가능한 모듈·파일]
제외: [이번에 하지 않을 변경]
검증: [실제 테스트/빌드/스크린샷 명령]

먼저 확인한 사실과 모르는 점을 알려 줘. 복잡한 변경이면 계획을 보여 준 뒤,
가장 작은 단위로 구현하고 검증 결과와 남은 위험을 보고해 줘.
Anthropic의 모범 사례는 실행 가능한 테스트·빌드·스크린샷을 Claude에게 주고, 복잡한 작업에는 탐색→계획→구현을 분리하라고 권한다. 단순한 오탈자 수정까지 계획 모드를 강제할 필요는 없다. 변경 후에는 내장 /verify나 해당 프로젝트의 실제 테스트를 실행하고, 중요한 변경은 다른 관점의 리뷰와 사람의 diff 검토까지 거친다. 테스트가 없으면 “통과”라고 쓰지 말고 검증하지 못한 범위를 보고한다.
작업 중에 다음 세션도 알아야 할 사실을 발견했다면, 명령·경로·예외 조건만 짧게 CLAUDE.md 또는 해당 문서에 반영한다. 한 번의 대화 기록을 통째로 붙이지 않는다. 장기 작업은 미완 항목과 마지막 검증 결과를 작업 문서나 이슈에 남겨 새 세션에서도 이어갈 수 있게 한다.
6. 플러그인은 어떤 순서로 고를까?
Claude Code에는 기본 도구와 내장 skill이 있다. 먼저 /help에서 /run, /verify, /code-review 등 현재 설치본에 제공되는 기능을 확인한다. 그 후 반복되는 문제에 맞는 공식 플러그인을 하나씩 더한다. 아래 이름은 Anthropic 공식 플러그인 저장소에서 확인할 수 있다.
| 플러그인 | 알맞은 때와 확인할 점 |
|---|---|
claude-md-management | 구조 변경 후 CLAUDE.md를 감사할 때. 제안된 diff는 사람이 승인한다. |
frontend-design | UI 구현이 반복될 때. 기존 디자인 시스템과 충돌하는지 확인한다. |
typescript-lsp | TS/JS 탐색과 진단이 많을 때. 별도 언어 서버 설치가 필요하다. |
code-review | PR 전 독립 검토가 필요할 때. 지적 사항을 실제 코드·테스트로 재확인한다. |
security-guidance | 인증·민감 정보 작업이 잦을 때. 보안 검토나 CI를 대체하지 않는다. |
feature-dev | 기존 코드베이스의 복잡한 기능 개발. 빈 프로젝트나 작은 수정에는 과하다. |
공식 마켓플레이스 claude-plugins-official은 보통 첫 대화형 실행 시 등록된다. 세션 안에서 /plugin으로 먼저 탐색하거나, 예를 들어 다음 명령으로 상세 화면을 열어 설치 범위와 구성을 검토한다.
/plugin install frontend-design@claude-plugins-official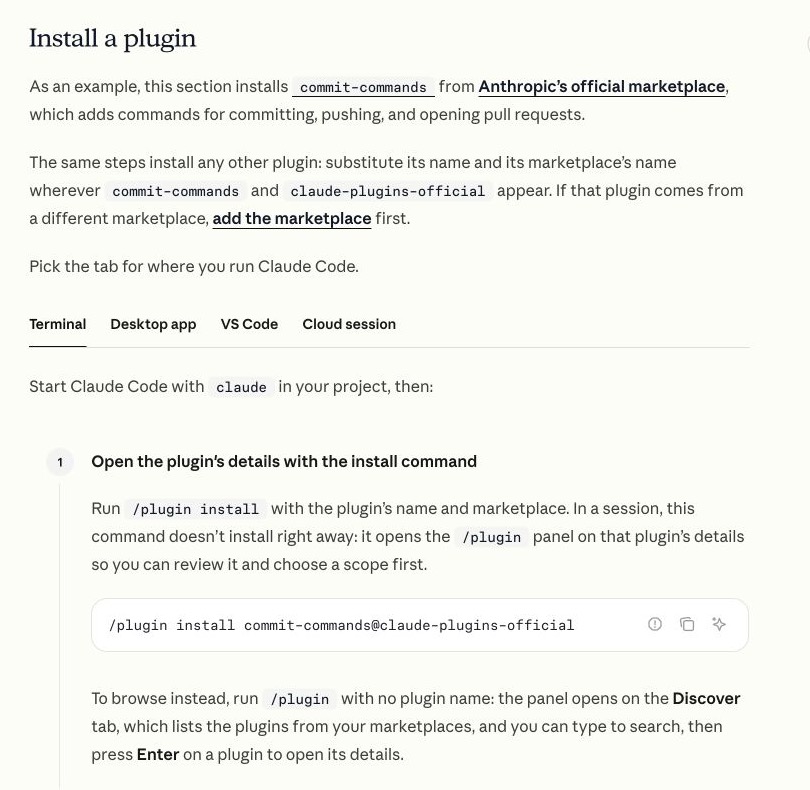
Anthropic의 플러그인 설치 공식 문서 공개 화면. /plugin install 이름@마켓플레이스가 상세·범위 선택 화면을 여는 과정을 보여 준다. (2026-10-13 캡처)
공식 마켓플레이스가 없다면 /plugin marketplace add anthropics/claude-plugins-official을 먼저 실행한다. 플러그인은 skill뿐 아니라 hook이나 MCP 서버를 포함할 수 있으므로 설치 전에 내용을 읽고 필요한 범위에만 활성화한다. CLAUDE.md 관리 플러그인의 상세 사용법은 별도 실전 가이드에 정리했다.
다른 프로젝트에 옮기는 방법
시작 템플릿 ZIP 다운로드에는 CLAUDE.md, docs/project-brief.md, docs/architecture.md, 선택적으로 적용할 settings.example.json과 안내문이 들어 있다. 기존 프로젝트에 바로 압축을 풀어 같은 이름의 파일을 덮어쓰지 말고, 별도 폴더에서 열어 필요한 부분만 복사한다. 템플릿의 대괄호·TODO·예시 명령을 실제 정보로 바꾸고, 첫 세션에서 /context와 실제 테스트 명령으로 확인한다.
마지막으로 다음 다섯 가지만 점검하면 충분하다.
- 목적·사용자·포함/제외 범위가
project-brief.md에 있다. CLAUDE.md의 명령과 경로가 실제로 존재하고 짧다.- 가장 작은 성공/실패 검사가 한 번 실행됐다.
- 비밀 값이 Git과 지침 파일에 없고, 권한 범위가 검토됐다.
- 첫 변경은 diff·테스트 결과·남은 위험을 보고한 뒤 사람이 검토한다.
하네스는 한 번에 완성하는 설정 모음이 아니라, 반복되는 실수를 발견할 때 정확한 층에 한 가지씩 더하는 과정이다. 더 넓은 설계 원칙은 Claude Code 하네스 엔지니어링 글에서 이어서 볼 수 있다.
When bringing Claude Code into a new project, you do not need to begin by installing plugins and filling pages of instructions. First make it easy for both Claude and your team to establish what the project builds, which commands really run and verify it, and what may be changed. Automate only the problems that recur.
This guide is based on the official quickstart, best practices, and extension overview as of October 13, 2026. A starter-kit ZIP at the end can be copied and adapted for another repository.
The core principle: build a small harness first
Here, harness engineering does not mean giving an AI a long prompt. It means connecting the project brief, tool access, work boundaries, tests, and review so that changes can be checked again. Anthropic's research on effective harnesses for long-running agents highlights small work units, progress records, and verification of real behavior. That research involved Agent SDK experiments, however; the configuration below is this article's proposal for applying those ideas lightly to a Claude Code project.
| Question | Start here → Expand only when needed |
|---|---|
| What are we building, and for whom? | README.md, docs/project-brief.md → A detailed product specification |
| What facts matter in every session? | A short CLAUDE.md or AGENTS.md → Path-scoped .claude/rules/ |
| How do we know it worked? | Real test/build commands and acceptance criteria → Hooks, CI, independent review |
| Is there a repeated procedure? | State it in the task for now → A project skill |
| Do we need an external system? | Nothing yet → Least-privilege MCP |
| Are we distributing the same capability across projects? | Nothing yet → A plugin |
Public page from Anthropic's official Claude Code extension documentation. It shows a structure that starts with persistent instructions and adds extensions only when needed. (Captured 2026-10-13)
The official documentation likewise recommends starting with CLAUDE.md for project conventions and adding extensions when a specific need appears. More plugins or a longer CLAUDE.md do not automatically produce a better understanding of your project.
1. Install it and start at the repository root
On macOS, Linux, and WSL, use the native installation command recommended in the official documentation. Before running an installer script, check that the domain is the official claude.ai domain, and follow your team's approved distribution method if one exists. For Windows or Homebrew, consult the official platform-specific installation instructions.
curl -fsSL https://claude.ai/install.sh | bash
claude --version
cd /path/to/your/project
claude
Your first run will prompt you to sign in. You need a Claude subscription, Console/API account, or access through a supported cloud provider. In a session, use /help to see the commands available to you.
If the project already has code, make this your first request:
파일을 수정하지 말고 이 저장소의 목적, 진입점, 실제 실행·테스트·빌드 명령,
주요 디렉터리, 현재 실패하는 검사와 모르는 점을 찾아 요약해 줘.
추측한 내용과 파일에서 확인한 내용을 구분해 줘.
Then run /init to create a draft of the project instructions. If CLAUDE.md already exists, /init proposes improvements instead of overwriting it. Run the generated commands yourself to check that they are correct, and look under Memory files in /context to confirm what actually loaded. If a new repository has no tests yet, do not invent a test command; create a minimal check with a clear pass/fail outcome alongside the first small feature.
2. Where should project knowledge live?
The layout below is not a standard that Claude Code enforces. It is a portable starting point for people and agents to work together.
your-project/
├── README.md                   # 사람이 읽는 제품·실행 개요
├── CLAUDE.md                   # 매 세션 필요한 짧은 규칙
├── docs/
│   ├── project-brief.md        # 사용자, 문제, 범위, 성공 기준
│   └── architecture.md         # 모듈 경계와 중요한 결정
└── .claude/
    ├── settings.json           # 필요할 때만 팀 공용 권한·hook 설정
    └── skills/                 # 반복 절차가 생길 때 추가
Put the human-facing overview and run instructions in README.md. Use project-brief.md for the product purpose and what you are not building this time. Keep CLAUDE.md to the short operating rules Claude needs every session; do not paste in long API specifications or procedures.
Public page from Anthropic's official project-memory documentation. It distinguishes the human-authored CLAUDE.md from auto memory accumulated by Claude. (Captured 2026-10-13)
The official documentation suggests targeting under 200 lines for CLAUDE.md and keeping it specific. An @docs/... import can help split files, but imported content is read at startup too, so it does not save context. Usually, point to long documents and have Claude read them only for relevant work. Recent Claude Code versions can directly read an existing AGENTS.md shared across coding tools. By default, however, a CLAUDE.md or CLAUDE.local.md in the project or a parent directory takes its place. To maintain both, import @AGENTS.md from CLAUDE.md or review the Project instructions option in /config.
3. Two documents you can copy right away
Start by writing the product context in docs/project-brief.md. Replace the bracketed placeholders for your project, and write 미정 (“undecided”) when you do not know. It is better to leave an open question than to fill a gap with a plausible guess.
# Project brief

## 목적
- 대상 사용자: [누가 사용하나]
- 해결할 문제: [현재 어떤 불편이 있나]
- 성공한 상태: [사용자가 무엇을 할 수 있나]

## 범위
- 이번에 포함: [핵심 흐름 1~3개]
- 이번에 제외: [명시적인 비목표]

## 제약
- 기술/운영 제약: [스택, 지원 환경, 일정 등]
- 민감 정보: [실제 값이 아닌 환경변수 이름과 보관 위치만]

## 첫 완료 기준
- 동작 확인: [재현 가능한 시나리오]
- 자동 검사: [실제로 실행되는 테스트/빌드 명령]
- 사람 검토: [결정이 필요한 항목]
Here is a minimal root-level CLAUDE.md. Replace its commands and paths with ones that actually exist in your repository before using it.
# Project operating guide

## Purpose
- Build: [one-sentence product goal]
- Read `docs/project-brief.md` when product scope is relevant.
- Read `docs/architecture.md` when changing module boundaries.

## Verified commands
- Dev: [actual command]
- Targeted test: [actual command]
- Build or typecheck: [actual command]

## Boundaries
- Follow existing patterns; avoid unrelated refactors.
- Do not add dependencies or change public APIs without explaining why.
- Do not put secrets or real customer data in files or output.
- Keep generated files and deployment settings untouched unless the task needs them.

## Done means
- Run the smallest relevant check, then the required broader checks.
- Report changed files, commands run, results, and remaining risks.
- Show the diff for review before commit or deployment.
The Read docs/... lines mention paths; they do not automatically import entire files. As the project grows, move file-type-specific instructions into .claude/rules/ with paths: frontmatter, and multi-step recurring workflows into .claude/skills/<name>/SKILL.md. You do not need to start by creating a collection of empty skill files.
4. Separate team settings from personal settings and permissions
According to the official settings-scope guide, ~/.claude/settings.json is shared across your own projects, .claude/settings.json is repository-level team configuration, and .claude/settings.local.json is personal to the current project. If you create the local file yourself, make sure Git ignores it. You can put personal project instructions in CLAUDE.local.md, but that file should also stay out of Git.
Keep team settings limited to what the team needs. For example, this is a starting rule that prevents Claude's direct file-reading tools from opening root-level .env files.
{
  "permissions": {
    "deny": ["Read(./.env)", "Read(./.env.*)"]
  }
}
Do not mistake that rule for operating-system-level secret protection. It is not a sandbox that blocks every indirect access through other commands or scripts. Keep real secrets out of the repository and combine separate secret storage, least privilege, and isolation where needed. Avoid leaving bypassPermissions enabled for convenience. Check the official permissions guide for an approval policy that fits your project's risk.
5. Make the first task exploration → a small change → verification
Instead of assigning a large feature all at once, make one work unit that names the relevant files, success criteria, exclusions, and how to check the result. You can reuse this request format:
@docs/project-brief.md를 읽고 이번 작업과 관련된 코드만 먼저 찾아 줘.

목표: [사용자가 얻게 될 결과]
현재 상태: [버그 증상 또는 빈 기능]
성공 조건: [입력/출력 또는 화면에서 확인할 결과]
범위: [수정 가능한 모듈·파일]
제외: [이번에 하지 않을 변경]
검증: [실제 테스트/빌드/스크린샷 명령]

먼저 확인한 사실과 모르는 점을 알려 줘. 복잡한 변경이면 계획을 보여 준 뒤,
가장 작은 단위로 구현하고 검증 결과와 남은 위험을 보고해 줘.
Anthropic's best practices recommend giving Claude runnable tests, builds, or screenshots and separating exploration, planning, and implementation for complex work. A simple typo does not need a mandatory plan phase. After the change, run the built-in /verify or the project's real tests, then use an independent perspective and human diff review for important changes. If no tests exist, do not say they “passed”; report what remains unverified.
When you discover something future sessions must know, add just the command, path, or exception to CLAUDE.md or the appropriate document. Do not paste in a whole conversation. For long-running work, record unfinished items and the last verification result in a task document or issue so the next session can pick up where you left off.
6. Which plugins should you choose, and when?
Claude Code comes with built-in tools and skills. First check /help for /run, /verify, /code-review, and the features available in your installed version. Then add an official plugin one at a time to address a recurring need. The names below can be checked in Anthropic's official plugin repository.
| Plugin | Good fit → Check before starting |
|---|---|
claude-md-management |
Auditing CLAUDE.md after structural changes → Have a person approve the proposed diff |
frontend-design |
Repeated UI implementation work → Check for conflicts with the existing design system |
typescript-lsp |
Frequent TS/JS navigation and diagnostics → Requires a separate language-server installation |
code-review |
Independent review before a PR → Recheck findings against real code and tests |
security-guidance |
Regular work on auth, secrets, or other risky areas → Does not replace a security review or CI |
feature-dev |
Building complex features step by step in an existing codebase → Too much overhead for an empty project or small fix |
The official claude-plugins-official marketplace is normally registered on the first interactive run. Browse it with /plugin inside a session, or open a plugin's details to review its components and installation scope with a command like this:
/plugin install frontend-design@claude-plugins-official
Public page from Anthropic's official plugin installation documentation. It shows how /plugin install name@marketplace opens the details and scope-selection screen. (Captured 2026-10-13)
If the official marketplace is missing, first run /plugin marketplace add anthropics/claude-plugins-official. A plugin may include hooks or MCP servers as well as skills, so inspect its contents and enable it only at the scope you need. For a closer look at the CLAUDE.md management plugin, see our hands-on guide.
Move the setup to another project
The starter-kit ZIP download includes CLAUDE.md, docs/project-brief.md, docs/architecture.md, an optional settings.example.json, and usage notes. Do not unpack it directly over an existing project's files with the same names. Open it in a separate folder and copy only what you need. Replace bracketed placeholders, TODO entries, and example commands with real information, then verify /context and the actual test command in your first session.
Five final checks are enough:
project-brief.mddescribes the purpose, users, and included and excluded scope.- The commands and paths in
CLAUDE.mdexist and the file stays short. - A smallest useful pass/fail check has run once.
- Secrets are absent from Git and instruction files, and permissions have been reviewed.
- A person reviews the first change after seeing the diff, test results, and remaining risks.
A harness is not a pile of settings finished in one sitting. It is a process of adding one safeguard to the right layer when a mistake recurs. For the broader design principles, continue with our Claude Code harness engineering article.
在新项目中引入 Claude Code 官方网站时,不必一开始就安装大量插件、写满长篇指令。先让 Claude 和团队都能确认:项目要做什么、真正可运行的启动与验证命令是什么、允许改动的范围在哪里。之后再自动化反复出现的问题。
本文依据截至 2026 年 10 月 13 日的官方快速入门、最佳实践和扩展功能说明编写。文末还提供可以复制到其他仓库并按需修改的入门模板 ZIP。
核心原则:先搭建小型 Harness
这里的 Harness Engineering(约束与验证环境工程),不是给 AI 一段很长的提示词,而是把项目说明、工具访问、工作边界、测试和审查串起来,让每次改动都能再次验证。Anthropic 关于长时间运行的 Agent Harness 的研究强调了小任务单元、进度记录和真实运行验证的重要性。不过那项研究基于 Agent SDK 实验;下面的配置是本文提出的方案,目的是将其思想轻量应用到 Claude Code 项目。
| 问题 | 最先放在哪里 → 何时再扩展 |
|---|---|
| 要做什么,服务谁? | README.md、docs/project-brief.md → 详细的产品规划文档 |
| 每次会话都必须知道哪些事实? | 简短的 CLAUDE.md 或 AGENTS.md → 按路径生效的 .claude/rules/ |
| 如何确认成功? | 真正可运行的测试/构建命令和完成标准 → Hook、CI、独立审查 |
| 是否出现了重复流程? | 暂时在任务请求中明确写出 → 项目 Skill |
| 是否需要外部系统? | 暂时不需要 → 最小权限的 MCP |
| 是否要把同一能力分发给多个项目? | 暂时不需要 → Plugin |
Anthropic 的Claude Code 扩展功能官方文档公开页面。它展示了从常驻指令出发、按需添加扩展的结构。(截取于 2026-10-13)
官方文档也建议先用 CLAUDE.md 记录项目惯例,遇到具体需求后再添加扩展。插件多、CLAUDE.md 长,并不意味着 Claude 一定更懂项目。
1. 安装,并从仓库根目录启动
在 macOS、Linux 和 WSL 上,使用官方文档推荐的原生安装命令。运行安装脚本前,确认域名是官方的 claude.ai;若团队有安全规定,则遵循团队批准的分发方式。Windows 或 Homebrew 用户可查看各系统的官方安装说明。
curl -fsSL https://claude.ai/install.sh | bash
claude --version
cd /path/to/your/project
claude
首次运行会出现登录提示。需要 Claude 订阅、Console/API 账户,或支持的云服务提供商访问权限。进入会话后,用 /help 查看当前可用命令。
如果仓库里已经有代码,先提出以下请求:
파일을 수정하지 말고 이 저장소의 목적, 진입점, 실제 실행·테스트·빌드 명령,
주요 디렉터리, 현재 실패하는 검사와 모르는 점을 찾아 요약해 줘.
추측한 내용과 파일에서 확인한 내용을 구분해 줘.
接着运行 /init,生成项目指令初稿。如果已有 CLAUDE.md,/init 会提出改进建议,而非直接覆盖。请亲自运行生成的命令,确认它们确实有效,并在 /context 的 Memory files 中检查实际加载了哪些文件。如果新仓库尚无测试,不要编造测试命令;可以在实现第一个小功能时,同时添加一个结果明确可判定为通过或失败的最小检查。
2. 项目内容应该写在哪里?
下面的结构不是 Claude Code 强制要求的标准,而是方便人与 Agent 协作的可迁移起点。
your-project/
├── README.md                   # 사람이 읽는 제품·실행 개요
├── CLAUDE.md                   # 매 세션 필요한 짧은 규칙
├── docs/
│   ├── project-brief.md        # 사용자, 문제, 범위, 성공 기준
│   └── architecture.md         # 모듈 경계와 중요한 결정
└── .claude/
    ├── settings.json           # 필요할 때만 팀 공용 권한·hook 설정
    └── skills/                 # 반복 절차가 생길 때 추가
在 README.md 中写人类读者需要的项目概览与运行方法;在 project-brief.md 中写产品目标,以及这次明确不做什么。CLAUDE.md 只保留 Claude 每次会话都需要的简短操作规则,不要把冗长的 API 规范和工作流程原样塞进去。
Anthropic 的项目记忆官方文档公开页面。它区分了人编写的 CLAUDE.md 和 Claude 自行积累的自动记忆。(截取于 2026-10-13)
官方文档建议把 CLAUDE.md 保持得简短、具体,并以少于 200 行为目标。@docs/... 导入有利于拆分文件,但导入内容也会在启动时读取,所以并不会节省上下文。对于长文档,平时只指出路径,让 Claude 在相关任务中再去读取。如果多个编程工具共用现有 AGENTS.md,新版 Claude Code 可以直接读取它。不过默认情况下,项目或上级目录中若有 CLAUDE.md 或 CLAUDE.local.md,Claude 会优先读取这些文件,而不是 AGENTS.md。需要共存时,可在 CLAUDE.md 中导入 @AGENTS.md,或检查 /config 中的 Project instructions 设置。
3. 两份可直接复制的文档
首先,在 docs/project-brief.md 中记录产品内容。根据项目替换下面的方括号占位符;不知道的内容就写 미정(待定)。与其填入看似合理的猜测,不如保留为待确认的问题。
# Project brief

## 목적
- 대상 사용자: [누가 사용하나]
- 해결할 문제: [현재 어떤 불편이 있나]
- 성공한 상태: [사용자가 무엇을 할 수 있나]

## 범위
- 이번에 포함: [핵심 흐름 1~3개]
- 이번에 제외: [명시적인 비목표]

## 제약
- 기술/운영 제약: [스택, 지원 환경, 일정 등]
- 민감 정보: [실제 값이 아닌 환경변수 이름과 보관 위치만]

## 첫 완료 기준
- 동작 확인: [재현 가능한 시나리오]
- 자동 검사: [실제로 실행되는 테스트/빌드 명령]
- 사람 검토: [결정이 필요한 항목]
接下来是仓库根目录 CLAUDE.md 的最小示例。使用前,务必把命令和路径改成与真实仓库一致的内容。
# Project operating guide

## Purpose
- Build: [one-sentence product goal]
- Read `docs/project-brief.md` when product scope is relevant.
- Read `docs/architecture.md` when changing module boundaries.

## Verified commands
- Dev: [actual command]
- Targeted test: [actual command]
- Build or typecheck: [actual command]

## Boundaries
- Follow existing patterns; avoid unrelated refactors.
- Do not add dependencies or change public APIs without explaining why.
- Do not put secrets or real customer data in files or output.
- Keep generated files and deployment settings untouched unless the task needs them.

## Done means
- Run the smallest relevant check, then the required broader checks.
- Report changed files, commands run, results, and remaining risks.
- Show the diff for review before commit or deployment.
这里的 Read docs/... 只是提到路径,并不会自动导入整个文件。项目变大后,可以用 .claude/rules/ 中的 paths: frontmatter 拆分针对特定文件类型的规则,把多步骤的重复工作移入 .claude/skills/<name>/SKILL.md。不必一开始就建好许多空的 Skill 文件。
4. 区分团队与个人设置及权限
根据官方设置作用范围说明,~/.claude/settings.json 是个人在所有项目中的通用设置,.claude/settings.json 是可随仓库共享的团队设置,.claude/settings.local.json 则是当前项目的个人设置。如果手动创建了本地文件,请确认 Git 会忽略它。个人项目指令可以写在 CLAUDE.local.md,但同样应将它排除在 Git 之外。
团队设置只放确实需要的内容。例如,下面是一条起始规则,用于阻止 Claude 的直接文件读取工具打开根目录的 .env 文件。
{
  "permissions": {
    "deny": ["Read(./.env)", "Read(./.env.*)"]
  }
}
不要把这条规则误认为操作系统级别的秘密保护。它不是能够阻止其他命令或脚本间接访问文件的沙箱。实际工作中的秘密不应进入仓库,还要配合独立存储、最小权限和隔离环境。也不要为了方便而一直开启 bypassPermissions。应根据项目风险,参照官方权限文档确定审批策略与执行环境。
5. 第一个任务:探索 → 小改动 → 验证
与其一次性交给 Claude 一项庞大的功能,不如把相关文件、成功条件、排除范围与检查方法放进一个工作单元。以下文字可作为第一次任务请求的模板:
@docs/project-brief.md를 읽고 이번 작업과 관련된 코드만 먼저 찾아 줘.

목표: [사용자가 얻게 될 결과]
현재 상태: [버그 증상 또는 빈 기능]
성공 조건: [입력/출력 또는 화면에서 확인할 결과]
범위: [수정 가능한 모듈·파일]
제외: [이번에 하지 않을 변경]
검증: [실제 테스트/빌드/스크린샷 명령]

먼저 확인한 사실과 모르는 점을 알려 줘. 복잡한 변경이면 계획을 보여 준 뒤,
가장 작은 단위로 구현하고 검증 결과와 남은 위험을 보고해 줘.
Anthropic 的最佳实践建议为 Claude 提供可运行的测试、构建或截图,并在复杂任务中分开探索、规划和实现。简单的错别字修改无须强制进入规划模式。改动完成后,运行内置 /verify 或项目真正的测试;重要变更还应经过另一视角的审查以及人工 diff 检查。如果没有测试,不要声称“测试通过”,而应说明哪些方面尚未验证。
工作中若发现下一次会话也必须知道的事实,只把相关命令、路径或例外条件简要补充到 CLAUDE.md 或对应文档。不要直接粘贴整段对话。对于长期任务,把未完成事项和上一次验证结果记录在任务文档或 Issue 中,以便新会话接续。
6. 应按什么顺序选择插件?
Claude Code 自带基本工具和 Skill。先在 /help 中确认当前安装版本是否提供 /run、/verify、/code-review 等能力。之后再针对反复出现的问题,一次只添加一个官方插件。下表中的名称都可以在 Anthropic 官方插件仓库核对。
| 插件 | 适用场景 → 开始前的注意事项 |
|---|---|
claude-md-management |
结构变更后审查 CLAUDE.md → 由人确认建议的 diff |
frontend-design |
经常进行 UI 实现 → 检查是否与既有设计系统冲突 |
typescript-lsp |
频繁导航和诊断 TS/JS 代码 → 需另外安装语言服务器 |
code-review |
PR 前需要独立审查 → 仍应通过真实代码和测试复核结论 |
security-guidance |
经常处理认证、敏感信息等高风险区域 → 不能替代安全审查或 CI |
feature-dev |
在既有代码库中分阶段开发复杂功能 → 对空项目或小修改来说过于繁重 |
官方的 claude-plugins-official Marketplace 通常会在首次交互式运行时注册。可以先在会话中通过 /plugin 浏览;也可以用以下命令打开插件详情,检查安装范围和组件:
/plugin install frontend-design@claude-plugins-official
Anthropic 的插件安装官方文档公开页面。它展示了 /plugin install 名称@Marketplace 如何打开详情和作用范围选择界面。(截取于 2026-10-13)
如果缺少官方 Marketplace,先运行 /plugin marketplace add anthropics/claude-plugins-official。插件除了 Skill,还可能包含 Hook 或 MCP 服务器,因此安装前应阅读其内容,并只在需要的范围启用。关于 CLAUDE.md 管理插件的具体使用方法,可以参阅另一篇实践指南。
如何迁移到其他项目
下载入门模板 ZIP,其中包含 CLAUDE.md、docs/project-brief.md、docs/architecture.md、可选的 settings.example.json 和使用说明。不要直接在现有项目里解压,覆盖同名文件;应先在独立文件夹中打开,仅复制所需部分。把方括号占位符、TODO 和示例命令换成真实信息,并在第一次会话中通过 /context 和实际测试命令确认。
最后,检查以下五项就足够了:
project-brief.md写明目的、用户,以及包含和排除的范围。CLAUDE.md中的命令和路径真实存在,文件本身保持简短。- 至少运行过一次最小的、能够区分成功和失败的检查。
- Git 与指令文件中没有秘密值,权限范围已经审查。
- 第一次改动要先报告 diff、测试结果和剩余风险,再由人审核。
Harness 不是一次性写完的一堆设置,而是在发现重复错误时,把一项新的防护加到正确的层。更广泛的设计原则可继续阅读Claude Code Harness Engineering 专文。
新しいプロジェクトでClaude Code公式サイトを開いたら、すぐにプラグインや長い指示を詰め込む必要はない。まずは何を作るプロジェクトなのか、実際の実行・検証コマンドは何か、どこまで変更してよいかを、Claudeと人が一緒に確認できる状態にする。そのうえで、繰り返し起きる問題だけを自動化する。
この記事は、2026年10月13日時点の公式クイックスタート、ベストプラクティス、拡張機能ガイドに基づく。最後には、別のリポジトリにコピーして調整できるスターターテンプレートZIPも用意した。
基本原則:まず小さなハーネスを作る
ここでいうハーネスエンジニアリングとは、AIに長いプロンプトを与えることではない。プロジェクトの説明、ツールへのアクセス、作業の境界、テストとレビューを結び付け、変更を検証し直せるようにする実務上の方法だ。Anthropicの長時間稼働エージェント向けハーネス研究は、作業を小さく区切ること、進捗を記録すること、実際の動作を検証することの重要性を示している。ただし、これはAgent SDKを使った実験であり、以下はその考え方をClaude Codeのプロジェクトに軽量に応用した本記事の提案である。
| 問い | 最初に置く場所 → 必要になったら拡張する場所 |
|---|---|
| 何を、誰のために作るのか? | README.md、docs/project-brief.md → 詳細な企画書 |
| セッションごとに知っておくべき事実は? | 短いCLAUDE.mdまたはAGENTS.md → パス別の.claude/rules/ |
| 成功をどう確認するか? | 実際のテスト・ビルドコマンドと完了基準 → hook、CI、独立したレビュー |
| 繰り返す手順ができたか? | その都度、依頼に明記 → プロジェクトのskill |
| 外部システムが必要か? | 不要 → 最小権限のMCP |
| 同じ機能を複数プロジェクトに配布するか? | 不要 → plugin |
AnthropicのClaude Code拡張機能に関する公式ドキュメントの公開ページ。常時読み込む指示から始め、必要な拡張だけを追加する構造を示している。(2026-10-13撮影)
公式ドキュメントも、まずCLAUDE.mdにプロジェクトの慣習を記録し、具体的な必要性が生じてから拡張するよう勧めている。プラグインの数が多くても、CLAUDE.mdが長くても、プロジェクトの理解度が自動的に高まるわけではない。
1. インストールしてリポジトリのルートから始める
macOS・Linux・WSLでは、公式ドキュメントが推奨するネイティブインストールコマンドを使用する。インストールスクリプトを実行する前に、ドメインが公式のclaude.aiであることを確かめ、チームにセキュリティポリシーがあればその配布方法に従う。WindowsやHomebrewを使う場合は、OS別の公式インストール手順を参照する。
curl -fsSL https://claude.ai/install.sh | bash
claude --version
cd /path/to/your/project
claude
初回起動時にはアカウントへのログインが案内される。Claudeのサブスクリプション、Console/APIアカウント、または対応するクラウドプロバイダーへのアクセス権が必要だ。セッション内で/helpを実行し、利用可能なコマンドを確認する。
既存のコードがあるなら、最初にこう依頼する。
파일을 수정하지 말고 이 저장소의 목적, 진입점, 실제 실행·테스트·빌드 명령,
주요 디렉터리, 현재 실패하는 검사와 모르는 점을 찾아 요약해 줘.
추측한 내용과 파일에서 확인한 내용을 구분해 줘.
次に/initでプロジェクト指示の下書きを作る。すでにCLAUDE.mdがある場合は、上書きせずに改善案を提示する。生成されたコマンドは自分で実行して正しいか確かめ、/contextのMemory filesで実際に読み込まれているか確認する。新しいリポジトリでまだテストがないなら、存在しないテストコマンドを作り上げず、最初の小さな機能とともに成功・失敗を判定できる最小限のチェックを作る。
2. プロジェクトの情報はどこに書く?
以下の構成はClaude Codeが強制する標準ではなく、人とエージェントが一緒に使いやすい移植可能な出発点だ。
your-project/
├── README.md                   # 사람이 읽는 제품·실행 개요
├── CLAUDE.md                   # 매 세션 필요한 짧은 규칙
├── docs/
│   ├── project-brief.md        # 사용자, 문제, 범위, 성공 기준
│   └── architecture.md         # 모듈 경계와 중요한 결정
└── .claude/
    ├── settings.json           # 필요할 때만 팀 공용 권한·hook 설정
    └── skills/                 # 반복 절차가 생길 때 추가
README.mdには、人がプロジェクトを理解して実行するための概要を書く。project-brief.mdには製品の目的と今回作らないものを記す。CLAUDE.mdには、Claudeが毎セッション知っておくべき短い運用ルールだけを置く。詳細なAPI仕様や長い作業手順をそのまま移さない。
Anthropicのプロジェクト記憶に関する公式ドキュメントの公開ページ。人が作成するCLAUDE.mdと、Claudeが蓄積する自動メモリの役割を区別している。(2026-10-13撮影)
公式ドキュメントは、CLAUDE.mdを200行未満を目安に短く具体的に保つよう勧めている。@docs/...のimportはファイルの整理には役立つが、起動時に中身も読み込むため、コンテキストの節約にはならない。長い文書は普段はパスだけ示し、該当する作業のときに読ませる。複数のコーディングツールで共有するAGENTS.mdがすでにある場合、最近のClaude Codeはそれを直接読める。ただし、プロジェクトまたは親ディレクトリにCLAUDE.mdかCLAUDE.local.mdがあると、デフォルト設定ではAGENTS.mdの代わりにそちらを読む。両方を維持するなら、CLAUDE.mdから@AGENTS.mdを取り込むか、/configのProject instructions設定を確認する。
3. そのままコピーできる二つの文書
まずdocs/project-brief.mdに製品の内容を記す。以下の角括弧はプロジェクトに合わせて置き換え、わからなければ未定と書く。曖昧な点をもっともらしく埋めるより、確認すべき質問として残すほうがよい。
# Project brief

## 목적
- 대상 사용자: [누가 사용하나]
- 해결할 문제: [현재 어떤 불편이 있나]
- 성공한 상태: [사용자가 무엇을 할 수 있나]

## 범위
- 이번에 포함: [핵심 흐름 1~3개]
- 이번에 제외: [명시적인 비목표]

## 제약
- 기술/운영 제약: [스택, 지원 환경, 일정 등]
- 민감 정보: [실제 값이 아닌 환경변수 이름과 보관 위치만]

## 첫 완료 기준
- 동작 확인: [재현 가능한 시나리오]
- 자동 검사: [실제로 실행되는 테스트/빌드 명령]
- 사람 검토: [결정이 필요한 항목]
次は、ルートに置くCLAUDE.mdの最小例だ。コマンドとパスを実際のリポジトリに合わせて修正してから使う。
# Project operating guide

## Purpose
- Build: [one-sentence product goal]
- Read `docs/project-brief.md` when product scope is relevant.
- Read `docs/architecture.md` when changing module boundaries.

## Verified commands
- Dev: [actual command]
- Targeted test: [actual command]
- Build or typecheck: [actual command]

## Boundaries
- Follow existing patterns; avoid unrelated refactors.
- Do not add dependencies or change public APIs without explaining why.
- Do not put secrets or real customer data in files or output.
- Keep generated files and deployment settings untouched unless the task needs them.

## Done means
- Run the smallest relevant check, then the required broader checks.
- Report changed files, commands run, results, and remaining risks.
- Show the diff for review before commit or deployment.
ここでRead docs/...はパスに言及しているだけで、ファイル全体を自動でimportする指示ではない。プロジェクトが大きくなったら、ファイル種別ごとのルールを.claude/rules/のpaths: frontmatterに分け、複数段階からなる反復作業は.claude/skills/<name>/SKILL.mdへ移す。最初から空のskillファイルをいくつも作る必要はない。
4. 設定と権限はチーム共有と個人用に分ける
公式の設定スコープのガイドによると、~/.claude/settings.jsonは個人の全プロジェクト共通設定、.claude/settings.jsonはリポジトリで共有するチーム設定、.claude/settings.local.jsonは現在のプロジェクトだけに適用する個人設定だ。ローカルファイルを手動で作った場合は、Gitの除外ルールを確認する。プロジェクト固有の個人的な指示はCLAUDE.local.mdに置けるが、こちらもGitから除外する。
チーム設定には必要な項目だけを入れる。たとえば次は、Claudeの直接ファイルを読むツールがルートの.envファイルを開くことを禁止する出発点となる例だ。
{
  "permissions": {
    "deny": ["Read(./.env)", "Read(./.env.*)"]
  }
}
このルールをOSレベルの秘密情報保護と誤解してはいけない。ほかのコマンドやスクリプトからの間接的なアクセスまで防ぐサンドボックスではないため、実際の秘密情報はリポジトリに入れず、別途の保管、最小権限、隔離された環境を組み合わせる。利便性のためにbypassPermissionsを常時オンにしておくことも避ける。承認ポリシーと実行環境は、プロジェクトのリスクに応じて公式の権限ドキュメントで確認する。
5. 最初の作業は調査 → 小さな変更 → 検証
新機能を一度に大きく任せるより、対象ファイル、成功条件、対象外の範囲、検証方法を一つの作業単位にまとめる。以下のテキストは最初の作業依頼のひな形として再利用できる。
@docs/project-brief.md를 읽고 이번 작업과 관련된 코드만 먼저 찾아 줘.

목표: [사용자가 얻게 될 결과]
현재 상태: [버그 증상 또는 빈 기능]
성공 조건: [입력/출력 또는 화면에서 확인할 결과]
범위: [수정 가능한 모듈·파일]
제외: [이번에 하지 않을 변경]
검증: [실제 테스트/빌드/스크린샷 명령]

먼저 확인한 사실과 모르는 점을 알려 줘. 복잡한 변경이면 계획을 보여 준 뒤,
가장 작은 단위로 구현하고 검증 결과와 남은 위험을 보고해 줘.
Anthropicのベストプラクティスは、実行可能なテスト・ビルド・スクリーンショットをClaudeに与え、複雑な作業では調査→計画→実装を分けるよう勧めている。ただし、単純な誤字修正にまで計画モードを強制する必要はない。変更後は組み込みの/verifyか、そのプロジェクトで実際に使うテストを実行し、重要な変更には別の視点からのレビューと人によるdiff確認も加える。テストがないなら「通過した」と書かず、検証できなかった範囲を報告する。
作業中に次のセッションでも知るべき事実を見つけたら、コマンド・パス・例外条件だけを短くCLAUDE.mdまたは該当する文書に反映する。一回の会話履歴を丸ごと貼り付けない。長期作業では未完了項目と最後の検証結果を作業文書やIssueに残し、新しいセッションでも続けられるようにする。
6. プラグインはどの順番で選ぶ?
Claude Codeには基本ツールと組み込みskillがある。まず/helpで、/run、/verify、/code-reviewなどが現在のインストールで使えるか確認する。その後、繰り返し起こる問題に合う公式プラグインを一つずつ追加する。以下の名前はAnthropicの公式プラグインリポジトリで確認できる。
| プラグイン | 向いている場面 → 導入時の注意点 |
|---|---|
claude-md-management |
構成変更後にCLAUDE.mdを監査するとき → 提案されたdiffは人が承認する |
frontend-design |
UI実装の作業が繰り返されるとき → 既存のデザインシステムとの衝突を確認する |
typescript-lsp |
TS/JSコードの探索と診断が多いとき → 言語サーバーの別途インストールが必要 |
code-review |
PR前に独立したレビューが必要なとき → レビュー結果も実際のコードとテストで再確認する |
security-guidance |
認証や機密情報など、リスクの高い領域の作業が多いとき → セキュリティレビューやCIの代わりにはならない |
feature-dev |
既存コードベースで複雑な機能を段階的に作るとき → 空のプロジェクトや小さな修正には過剰 |
公式マーケットプレイスclaude-plugins-officialは通常、最初の対話セッションで登録される。セッション内で/pluginから先に探すか、たとえば次のコマンドで詳細画面を開き、インストール範囲と構成を確認する。
/plugin install frontend-design@claude-plugins-official
Anthropicのプラグイン導入に関する公式ドキュメントの公開ページ。/plugin install 名前@マーケットプレイスで詳細と適用範囲の選択画面を開く手順を示している。(2026-10-13撮影)
公式マーケットプレイスがない場合は、先に/plugin marketplace add anthropics/claude-plugins-officialを実行する。プラグインにはskillだけでなくhookやMCPサーバーが含まれることもあるため、インストール前に内容を読み、必要な範囲だけで有効にする。CLAUDE.md管理プラグインの詳しい使い方は別の実践ガイドにまとめている。
別のプロジェクトに移す方法
スターターテンプレートZIPをダウンロードすると、CLAUDE.md、docs/project-brief.md、docs/architecture.md、任意で適用するsettings.example.json、案内文が入っている。既存プロジェクトへ直接展開して同名のファイルを上書きせず、別フォルダーで開いて必要な部分だけコピーする。テンプレートの角括弧・TODO・例示コマンドを実際の情報に置き換え、最初のセッションで/contextと実際のテストコマンドを使って確認する。
最後に、次の五つを点検すれば十分だ。
- 目的・ユーザー・対象範囲と対象外が
project-brief.mdに書かれている。 CLAUDE.mdのコマンドとパスが実在し、内容が短い。- 最小限の成功・失敗を判定できるチェックを一度実行した。
- 秘密情報の値がGitや指示ファイルに含まれず、権限の範囲を確認した。
- 最初の変更はdiff・テスト結果・残るリスクを報告した後、人がレビューする。
ハーネスは一度に完成させる設定集ではなく、繰り返される失敗を見つけたときに、適切な層へ一つずつ追加していくプロセスだ。より広い設計原則はClaude Codeのハーネスエンジニアリング記事で続けて読める。
Al abrir el sitio oficial de Claude Code para un proyecto nuevo, no hace falta llenarlo de plugins ni de instrucciones extensas. Primero hay que dejar claro, tanto para Claude como para el equipo, qué construye el proyecto, cuáles son los comandos reales para ejecutarlo y verificarlo y qué cambios están permitidos. Después, automatiza solo los problemas que se repitan.
Este artículo se basa en la guía oficial de inicio rápido, las buenas prácticas y la guía de extensiones vigentes al 13 de octubre de 2026. Al final encontrarás también un ZIP con la plantilla inicial para copiarla y adaptarla a otros repositorios.
Principio clave: empieza con un harness pequeño
Aquí, ingeniería de harness no significa darle a la IA un prompt largo. Significa conectar la descripción del proyecto, el acceso a herramientas, los límites del trabajo, las pruebas y la revisión para que los cambios se puedan comprobar. El estudio de Anthropic sobre harnesses para agentes de larga duración muestra la importancia de trabajar en unidades pequeñas, registrar el progreso y verificar el funcionamiento real. Sin embargo, ese estudio se hizo con Agent SDK; lo que sigue es una propuesta de este artículo para aplicar sus ideas de forma ligera a un proyecto de Claude Code.
| Pregunta | Dónde empezar → Qué añadir cuando haga falta |
|---|---|
| ¿Qué se construye y para quién? | README.md, docs/project-brief.md → Documento de producto más detallado |
| ¿Qué debe saber en cada sesión? | Un CLAUDE.md o AGENTS.md breve → Reglas por ruta en .claude/rules/ |
| ¿Cómo se comprueba el éxito? | Comandos reales de prueba y compilación, con criterios de terminado → Hook, CI y revisión independiente |
| ¿Hay un procedimiento que se repite? | Especificarlo en cada solicitud → Skill del proyecto |
| ¿Hace falta un sistema externo? | No → MCP con los mínimos permisos |
| ¿Se distribuirá la misma función en varios proyectos? | No → Plugin |
Página pública de la documentación oficial de extensiones de Claude Code, de Anthropic. Muestra cómo empezar con las instrucciones siempre activas y añadir solo las extensiones necesarias. (Captura del 2026-10-13)
La documentación oficial también recomienda registrar primero las convenciones en CLAUDE.md y ampliar la configuración cuando surja una necesidad concreta. Tener muchos plugins o un CLAUDE.md largo no mejora automáticamente la comprensión del proyecto.
1. Instala Claude Code y empieza en la raíz del repositorio
En macOS, Linux y WSL, utiliza el comando de instalación nativa recomendado en la documentación oficial. Antes de ejecutar el script, comprueba que el dominio sea el oficial, claude.ai, y sigue el método de distribución de tu equipo si existe una política de seguridad. Si usas Windows o Homebrew, consulta las instrucciones oficiales para cada sistema operativo.
curl -fsSL https://claude.ai/install.sh | bash
claude --version
cd /path/to/your/project
claude
En el primer inicio se te pedirá que inicies sesión. Necesitas una suscripción a Claude, una cuenta de Console/API o acceso a un proveedor de nube compatible. Dentro de la sesión, consulta los comandos disponibles con /help.
Si el proyecto ya tiene código, empieza con esta petición.
파일을 수정하지 말고 이 저장소의 목적, 진입점, 실제 실행·테스트·빌드 명령,
주요 디렉터리, 현재 실패하는 검사와 모르는 점을 찾아 요약해 줘.
추측한 내용과 파일에서 확인한 내용을 구분해 줘.
Después, usa /init para generar un borrador de instrucciones del proyecto. Si ya existe un CLAUDE.md, propone mejoras en lugar de sobrescribirlo. Ejecuta personalmente los comandos generados para comprobar que funcionan y verifica en Memory files, dentro de /context, que el archivo realmente se haya cargado. Si el repositorio es nuevo y aún no tiene pruebas, no inventes un comando de test: crea, junto con la primera función pequeña, una comprobación mínima capaz de distinguir éxito y fallo.
2. ¿Dónde guardar la información del proyecto?
La siguiente estructura no es un estándar obligatorio de Claude Code, sino un punto de partida portable para personas y agentes.
your-project/
├── README.md                   # 사람이 읽는 제품·실행 개요
├── CLAUDE.md                   # 매 세션 필요한 짧은 규칙
├── docs/
│   ├── project-brief.md        # 사용자, 문제, 범위, 성공 기준
│   └── architecture.md         # 모듈 경계와 중요한 결정
└── .claude/
    ├── settings.json           # 필요할 때만 팀 공용 권한·hook 설정
    └── skills/                 # 반복 절차가 생길 때 추가
En README.md, escribe una visión general que ayude a una persona a entender y ejecutar el proyecto. En project-brief.md, describe el objetivo del producto y lo que no se hará en esta etapa. Reserva CLAUDE.md para las reglas operativas breves que Claude debe conocer en cada sesión. No vuelques allí especificaciones completas de API ni procedimientos largos.
Página pública de la documentación oficial sobre la memoria del proyecto, de Anthropic. Distingue entre el CLAUDE.md escrito por una persona y la memoria automática acumulada por Claude. (Captura del 2026-10-13)
La documentación oficial recomienda que CLAUDE.md sea breve y específico, con menos de 200 líneas como objetivo. Una importación @docs/... sirve para organizar archivos, pero no ahorra contexto: su contenido también se carga al iniciar la sesión. Para los documentos largos, indica normalmente solo su ruta y haz que se lean cuando el trabajo los requiera. Si ya existe un AGENTS.md compartido por varias herramientas de programación, las versiones recientes de Claude Code pueden leerlo directamente. Sin embargo, si hay un CLAUDE.md o CLAUDE.local.md en el proyecto o en un directorio superior, por defecto se leerá ese archivo en lugar de AGENTS.md. Si mantienes ambos, importa @AGENTS.md desde CLAUDE.md o revisa la opción Project instructions en /config.
3. Dos documentos listos para copiar
Primero, escribe el contenido del producto en docs/project-brief.md. Sustituye los corchetes por la información del proyecto; si algo no se sabe, escribe por definir. Es mejor dejar una pregunta pendiente que rellenar una ambigüedad con una suposición convincente.
# Project brief

## 목적
- 대상 사용자: [누가 사용하나]
- 해결할 문제: [현재 어떤 불편이 있나]
- 성공한 상태: [사용자가 무엇을 할 수 있나]

## 범위
- 이번에 포함: [핵심 흐름 1~3개]
- 이번에 제외: [명시적인 비목표]

## 제약
- 기술/운영 제약: [스택, 지원 환경, 일정 등]
- 민감 정보: [실제 값이 아닌 환경변수 이름과 보관 위치만]

## 첫 완료 기준
- 동작 확인: [재현 가능한 시나리오]
- 자동 검사: [실제로 실행되는 테스트/빌드 명령]
- 사람 검토: [결정이 필요한 항목]
El siguiente es un ejemplo mínimo para el CLAUDE.md de la raíz. Úsalo solo después de adaptar los comandos y las rutas al repositorio real.
# Project operating guide

## Purpose
- Build: [one-sentence product goal]
- Read `docs/project-brief.md` when product scope is relevant.
- Read `docs/architecture.md` when changing module boundaries.

## Verified commands
- Dev: [actual command]
- Targeted test: [actual command]
- Build or typecheck: [actual command]

## Boundaries
- Follow existing patterns; avoid unrelated refactors.
- Do not add dependencies or change public APIs without explaining why.
- Do not put secrets or real customer data in files or output.
- Keep generated files and deployment settings untouched unless the task needs them.

## Done means
- Run the smallest relevant check, then the required broader checks.
- Report changed files, commands run, results, and remaining risks.
- Show the diff for review before commit or deployment.
Aquí, Read docs/... solo menciona una ruta; no ordena importar automáticamente todo el archivo. Si el proyecto crece, separa las reglas por tipo de archivo con el frontmatter paths: de .claude/rules/, y convierte los procedimientos repetidos de varios pasos en .claude/skills/<name>/SKILL.md. No hace falta crear desde el principio varios archivos de skill vacíos.
4. Separa la configuración compartida de la personal
Según la guía oficial sobre el alcance de los ajustes, ~/.claude/settings.json contiene preferencias personales para todos tus proyectos, .claude/settings.json contiene ajustes del equipo compartidos en el repositorio y .claude/settings.local.json contiene ajustes personales para este proyecto. Si creas el archivo local a mano, comprueba que esté excluido de Git. También puedes guardar instrucciones personales específicas del proyecto en CLAUDE.local.md, que igualmente debe quedar fuera de Git.
Incluye en la configuración del equipo solo lo necesario. Por ejemplo, la siguiente regla inicial impide que la herramienta de lectura directa de archivos de Claude abra archivos .env en la raíz.
{
  "permissions": {
    "deny": ["Read(./.env)", "Read(./.env.*)"]
  }
}
No confundas esa regla con una protección de secretos a nivel del sistema operativo. No es un sandbox que impida el acceso indirecto mediante otros comandos o scripts. Por eso, no guardes secretos reales en el repositorio y combina almacenamiento separado, permisos mínimos y un entorno aislado. Evita también dejar activado bypassPermissions solo por comodidad. Consulta la documentación oficial sobre permisos para ajustar las aprobaciones y el entorno de ejecución al riesgo del proyecto.
5. Primera tarea: explorar → cambiar poco → verificar
En vez de encargar una función grande de una sola vez, reúne los archivos afectados, los criterios de éxito, las exclusiones y el método de comprobación en una unidad pequeña de trabajo. Puedes reutilizar el siguiente texto como estructura para la primera solicitud.
@docs/project-brief.md를 읽고 이번 작업과 관련된 코드만 먼저 찾아 줘.

목표: [사용자가 얻게 될 결과]
현재 상태: [버그 증상 또는 빈 기능]
성공 조건: [입력/출력 또는 화면에서 확인할 결과]
범위: [수정 가능한 모듈·파일]
제외: [이번에 하지 않을 변경]
검증: [실제 테스트/빌드/스크린샷 명령]

먼저 확인한 사실과 모르는 점을 알려 줘. 복잡한 변경이면 계획을 보여 준 뒤,
가장 작은 단위로 구현하고 검증 결과와 남은 위험을 보고해 줘.
Las buenas prácticas de Anthropic aconsejan dar a Claude pruebas, compilaciones o capturas de pantalla que pueda ejecutar y separar exploración, planificación e implementación en las tareas complejas. No hace falta imponer el modo de planificación para corregir una simple errata. Tras un cambio, ejecuta la función integrada /verify o las pruebas reales del proyecto; en los cambios importantes, añade una revisión desde otra perspectiva y una inspección humana del diff. Si no hay pruebas, no escribas «todo pasó»: indica qué no se pudo verificar.
Si durante el trabajo descubres un dato que también será necesario en la siguiente sesión, añade solo el comando, la ruta o la excepción relevante a CLAUDE.md o al documento correspondiente. No pegues una conversación completa. En tareas largas, deja constancia de los puntos pendientes y del resultado de la última verificación en un documento de trabajo o una incidencia, para poder retomarlos en una nueva sesión.
6. ¿En qué orden conviene elegir los plugins?
Claude Code ya incluye herramientas básicas y skills integradas. Primero comprueba con /help si tu instalación ofrece /run, /verify, /code-review y otras funciones. Después, añade de uno en uno los plugins oficiales que resuelvan problemas recurrentes. Los siguientes nombres se pueden comprobar en el repositorio oficial de plugins de Anthropic.
| Plugin | Cuándo conviene → Precaución inicial |
|---|---|
claude-md-management |
Al auditar CLAUDE.md después de cambiar la estructura → Una persona debe aprobar el diff propuesto |
frontend-design |
Cuando se repiten trabajos de implementación de UI → Comprobar posibles conflictos con el sistema de diseño existente |
typescript-lsp |
Cuando abundan la navegación y el diagnóstico de código TS/JS → Requiere instalar aparte un servidor de lenguaje |
code-review |
Cuando se necesita una revisión independiente antes de una PR → Volver a contrastar los hallazgos con el código y las pruebas |
security-guidance |
Cuando son frecuentes los trabajos sobre autenticación o datos sensibles → No sustituye una revisión de seguridad ni CI |
feature-dev |
Al construir por etapas una función compleja en una base de código existente → Puede ser excesivo para un proyecto vacío o un cambio pequeño |
El marketplace oficial claude-plugins-official suele registrarse durante la primera sesión interactiva. Puedes empezar explorando con /plugin o abrir, por ejemplo, la pantalla de detalles con el siguiente comando para revisar la configuración y el alcance de la instalación.
/plugin install frontend-design@claude-plugins-official
Página pública de la documentación oficial de instalación de plugins, de Anthropic. Muestra cómo /plugin install nombre@marketplace abre la pantalla de detalles y selección del alcance. (Captura del 2026-10-13)
Si no aparece el marketplace oficial, ejecuta antes /plugin marketplace add anthropics/claude-plugins-official. Un plugin puede incluir no solo skills, sino también hooks o servidores MCP; lee su contenido antes de instalarlo y actívalo solo donde haga falta. El uso detallado del plugin para gestionar CLAUDE.md se explica en una guía práctica aparte.
Cómo llevarlo a otro proyecto
El ZIP de la plantilla inicial contiene CLAUDE.md, docs/project-brief.md, docs/architecture.md, un settings.example.json opcional y una guía. No descomprimas el ZIP directamente sobre un proyecto existente para sobrescribir archivos con el mismo nombre; ábrelo en una carpeta aparte y copia solo lo necesario. Sustituye los corchetes, los TODO y los comandos de ejemplo por datos reales, y compruébalos en la primera sesión con /context y el comando de prueba correspondiente.
Por último, basta con revisar estos cinco puntos:
project-brief.mdcontiene el objetivo, los usuarios y lo que entra y no entra en el alcance.- Los comandos y las rutas de
CLAUDE.mdexisten y el archivo es breve. - Se ha ejecutado una vez una comprobación mínima que distingue éxito y fallo.
- Los secretos no están en Git ni en los archivos de instrucciones, y se ha revisado el alcance de los permisos.
- Tras el primer cambio, se informa del diff, los resultados de las pruebas y los riesgos pendientes antes de la revisión humana.
Un harness no es una colección de ajustes que deba completarse de una vez. Es un proceso de añadir una pieza a la capa adecuada cuando aparece un error recurrente. Puedes seguir con los principios de diseño más amplios en el artículo sobre ingeniería de harness para Claude Code.